The Be7 variation (named after Adolf Anderssen) is perhaps the most equalizing variation for black of the Evan’s Gambit.
Black chooses to take a more passive defense and overprotect the g5 square with both the dark squared bishop and queen.
The drawback to this opening for black is how passive it feels. Black has captured a pawn, but has moved the bishop 3 times, with the last movement to a defensive square.
Nevertheless, it is worth knowing how to play against as white and what ideas change in comparison to the other move 6 variations.
- Move 5…Be7 of the Evan’s Gambit
- Gary Kasparov vs Vichywanathan Anand 1995
- Bobby Fischer vs O. Celle 1964
- Louis De la Bourdonnais vs Boncourt 1836
Table of Contents
Move 5…Be7 of the Evan’s Gambit
1. e4 e5 2. Nf3 Nc6 3. Bc4 Bc5 4. B4 Bxb4 5. c3 Be7
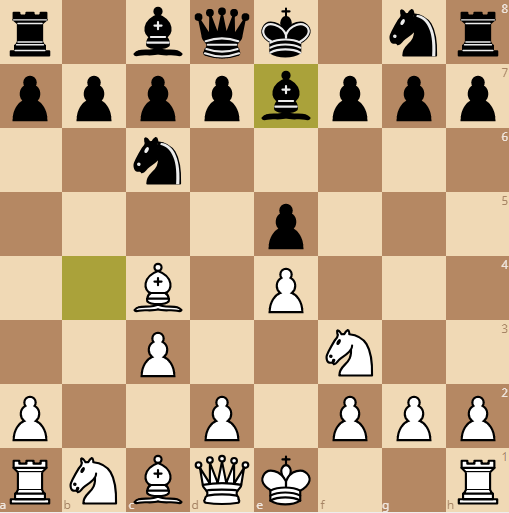
Let’s look at what happens if white plays the most common move, d4.
This move opens the lines for the dark squared bishop, which can now hit the defender of f7.
Note that the same ideas of the Evan’s Gambit are in effect: you want to continue pressure on f7 and stop black from castling. White is planning to play Qb3 to attack f7 twice.
The black kingside knight has not developed yet, so it is likely to go to h6 to overdefend f7. D4 helps prevent this and attacks the center.
Black Counters with Na5
6. d4 Na5
The most common, and best answer for black. Black wants to trade off the light squared bishop and prevent the pressure on f7.
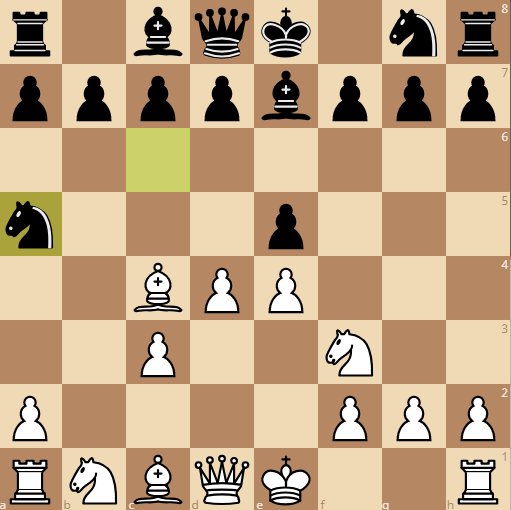
White has a few options to try out so let’s look at what happens to white’s strong center if he grabs the pawn that’s seemingly hanging on e5.
7. Nxe5
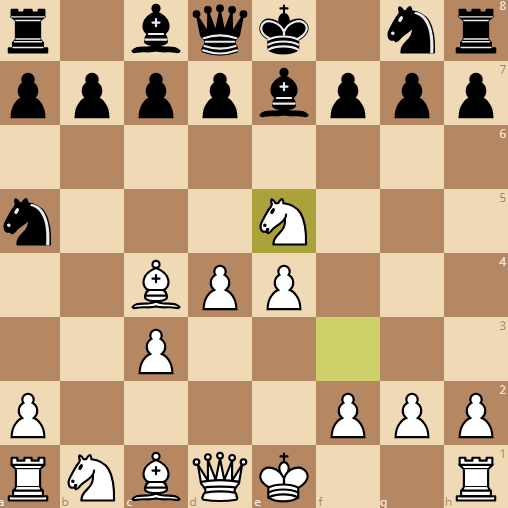
Immediately equalizing the material by gaining your pawn back. Even better, white has managed to trade a flank pawn (b pawn) for a central pawn e4).
7…Nxc4 8. Nxc4
White’s center looks unstoppable until…
8…d5
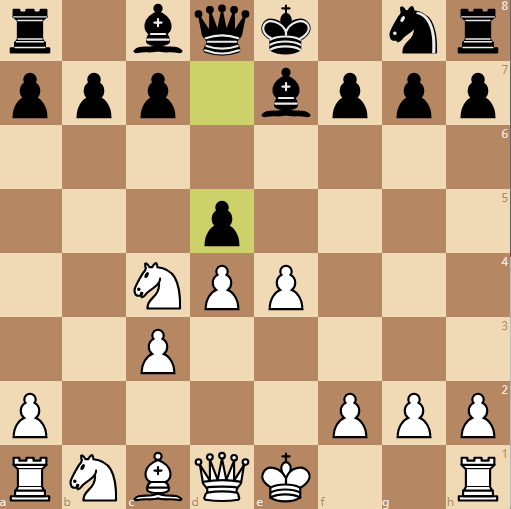
The move d5 is often the decisive, equalizing move for black. It forces the pawn to recapture and break up white’s great center.
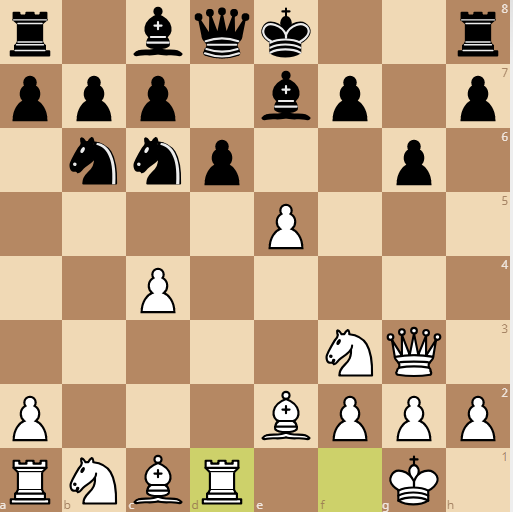
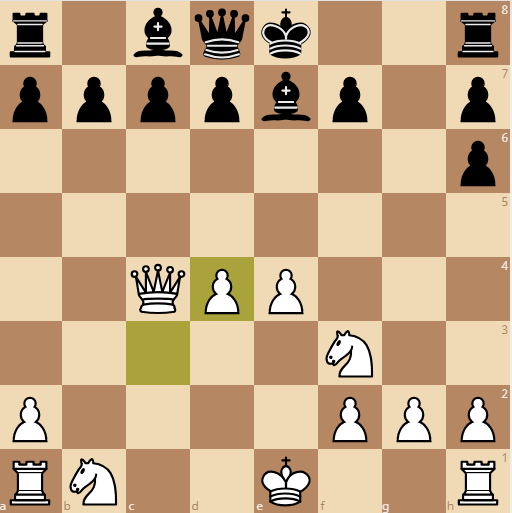
9. exd5 Qxd5 10. Ne3
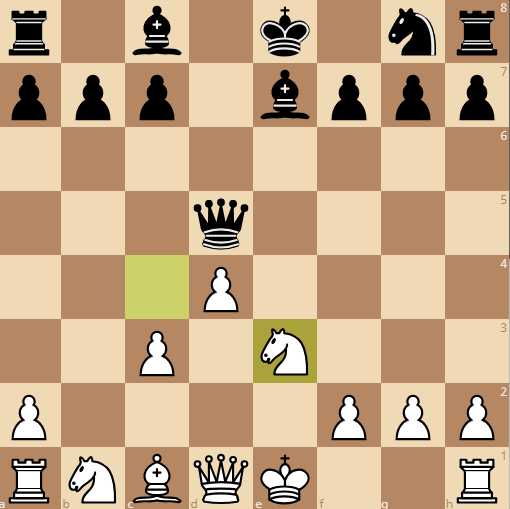
This is an equal line and black’s best chance to equalize. Sure it’s not winning for white, but this is part of why the Evan’s Gambit is not irrefutable.
Looking at the position, you can choose either side to play as and be alright. Let’s break down why:
For white
- castling can be achieved immediately
- The c3 pawn makes the dark squared bishop awkward.
- Achieving c4 and d4 will give the knight a great square on c3
- White has 3 pawn islands
For black
- Casling can be achieved in 2 moves
- The bishop pair is maintained
- The queen is centralized, but can be an easy target once white castles
In the above example, the light squared bishop did not retreat. White chose to grab the pawn back instead.
However, what would happen if white moved the bishop, like Gary Kasparov did in this game.
Gary Kasparov vs Vichywanathan Anand 1995
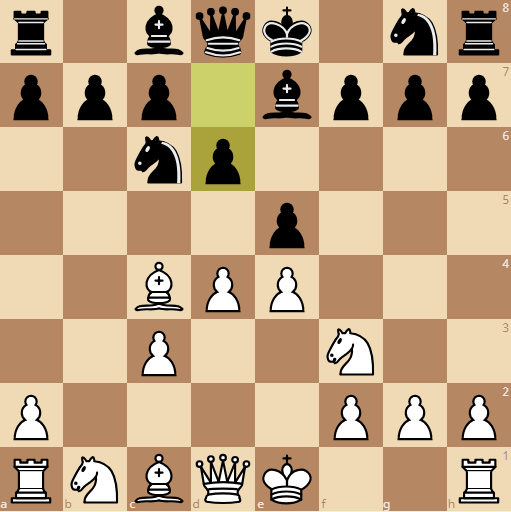
1. e4 e5 2. Nf3 Nc6 3. Bc4 Bc5 4. b4 Bxb4 5. c3 Be7 6. d4 Na5 7. Be2
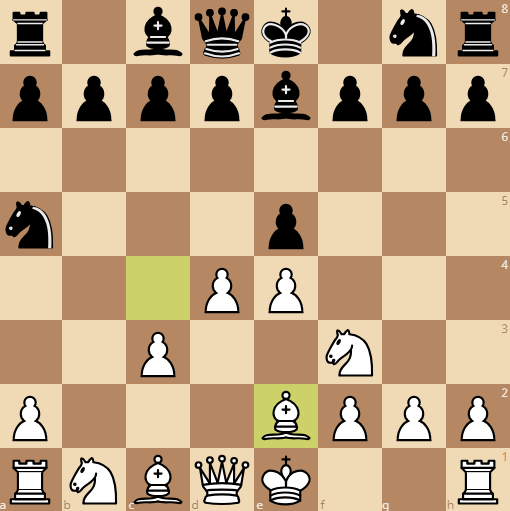
Note: the normal move is Be3. Since black intends to castle kingside, the eventual movement of the e4 pawn will give some pressure on h7.
Garry Kasparov tried out 7.Be2!?, against which Black should probably reinforce the e5-pawn with 7…d6 rather than heading into what happened.
You should also note that black is still not quite developed. It’s hard to develop the kingside knight right now because nh6 can open the kingside and g file, while nf6 leads to a gain of tempo with dxe5.
7…exd4 8. Qxd4
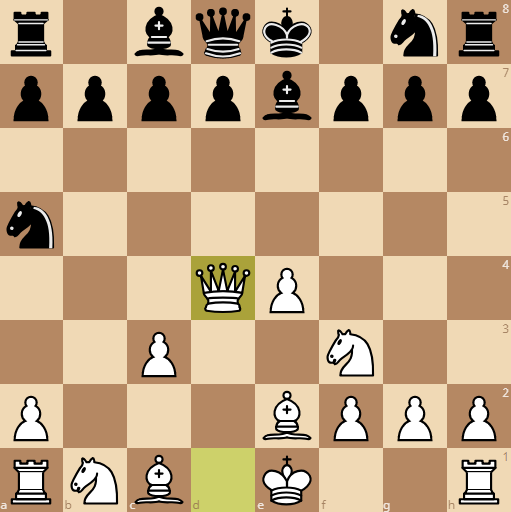
An interesting twist that targets the g7 weakness. White doesn’t mind the backwards, isolated pawn on c3 right now. The goal is always aggressive and constant pressure in the Evan’s Gambit.
Nf6 9. e5 Nc6 10. Qh4

Keeping pressure on the kingside and making castling for black possible, but stressful.
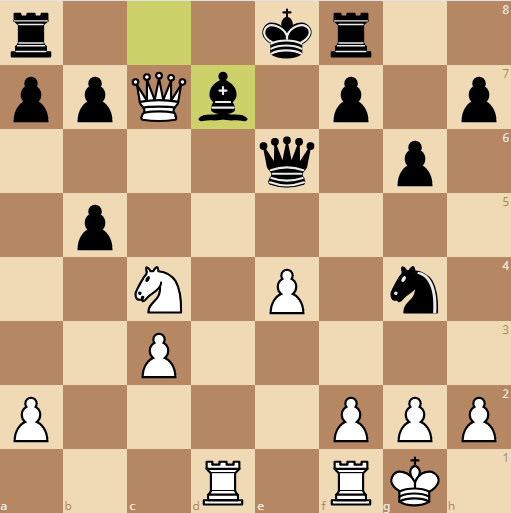
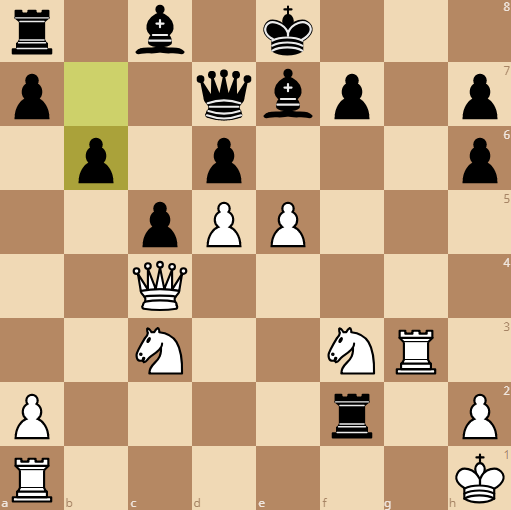
Nd5 11. Qg3 g6 12. O-O
Black has created a kingside weaknesses as the dark squared bishop is unable to easily fill the hole now created on g7. Note that castling for black on move 11 would have led to a loss of material with 12. Bh6!
Nb6 13. c4 d6 14. Rd1
Always keeping pressure and activating pieces with tempo is important. The rook wants to stay on the same file as the queen since the queen’s movement is limited.
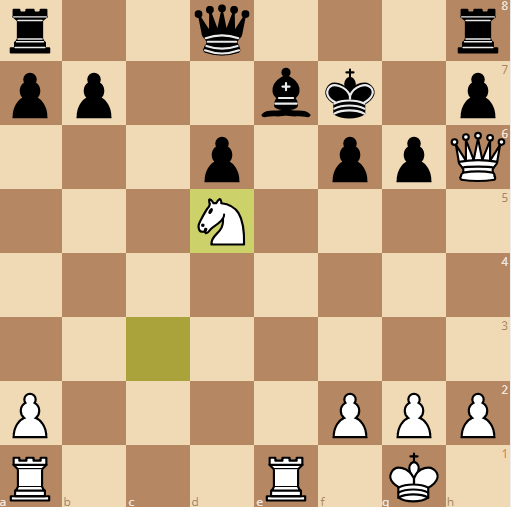
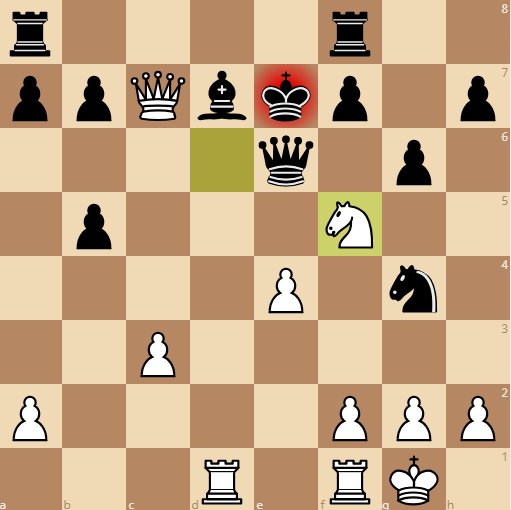
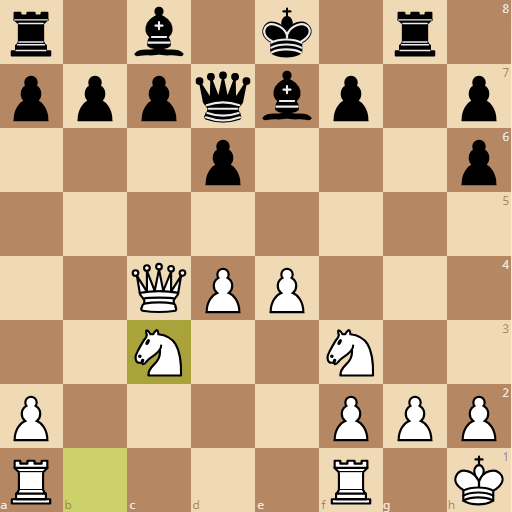
Nd7 15. Bh6 Ncxe5 16. Nxe5 Nxe5 17. Nc3
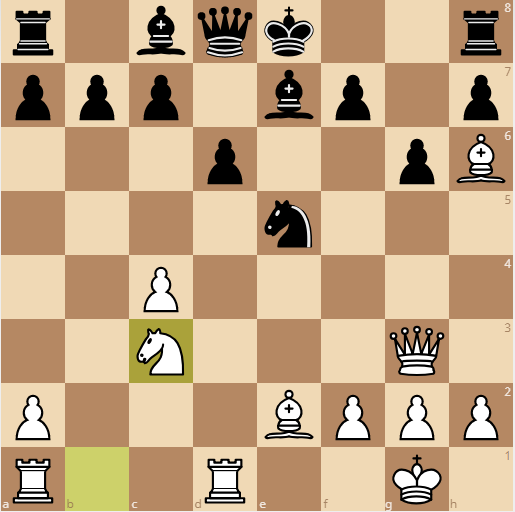
Finally the queenside knight is developed. This was the reason for c4 earlier (while also controlling the e4 square.
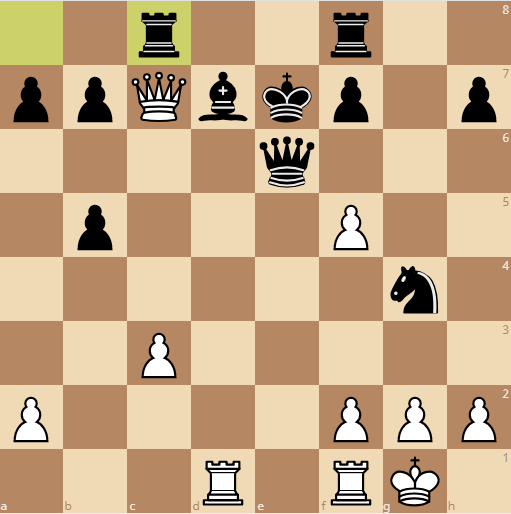
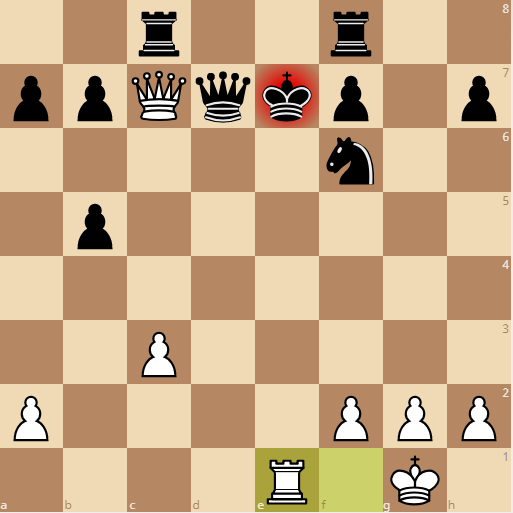
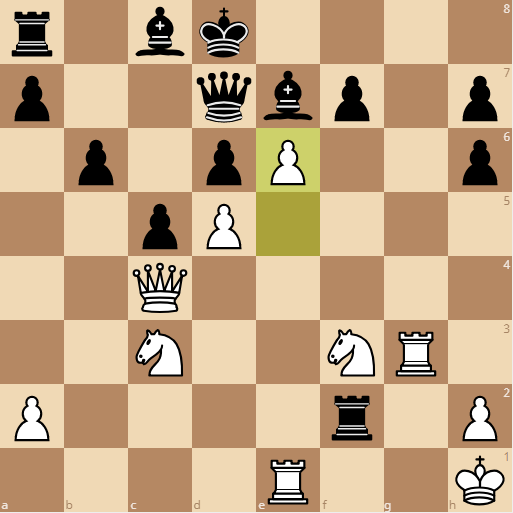
17…f6 18. c5 Nf7 19. cxd6 cxd6 20. Qe3 Nxh6 21. Qxh6
The black bishops are still very passive and the king has no safe space to castle. Neither rook is active while white has complete rein over the board.
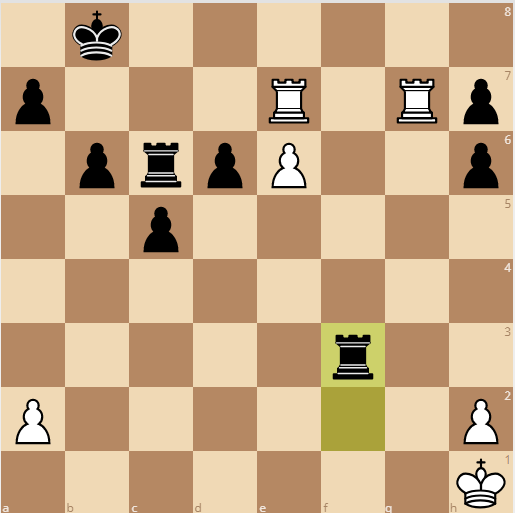
21…Kf7 22. Bc4+ Be6 23. Bxe6+ Kxe6 24. Re1+
It’s never good when your king is move active, and has moved more times, than your queen and rooks combined.
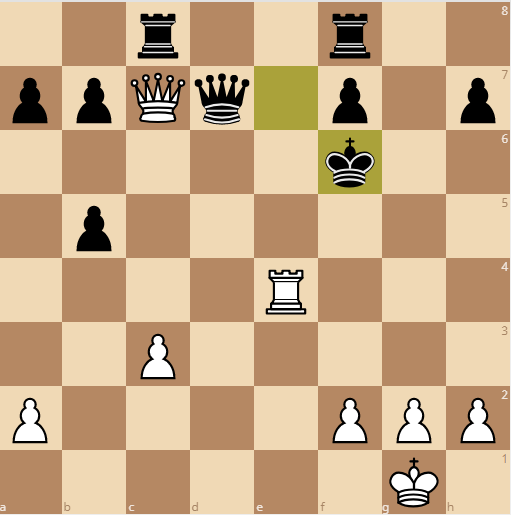
Kf7 25. Nd5 *
And white is winning material. If 25…Bf8, white can control the light squares with Qh3. The ultimate goal from this point is to bring the rook on a1 to c1 and try to infiltrate into the 7th rank.
White’s untouchable knight and black’s blocked bishop and inactive rooks make this an easy win for white.
Bobby Fischer vs O. Celle 1964
Here’s another sharp variation you may like featuring Bobby Fischer.
1. e4 e5 2. Nf3 Nc6 3. Bc4 Bc5 4. b4 Bxb4 5. c3 Be7 6. d4 d6
Black responds with d6, the move we mentioned in the last game.
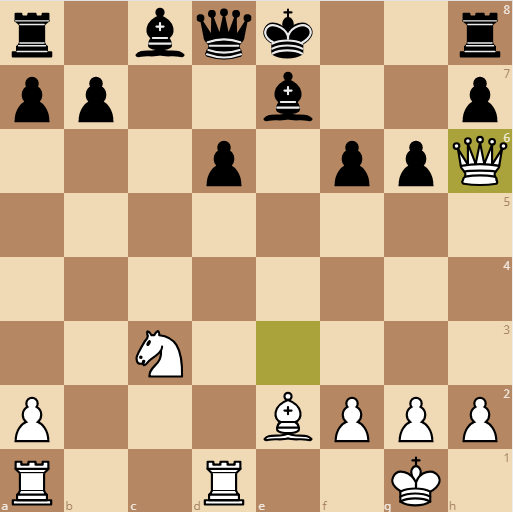
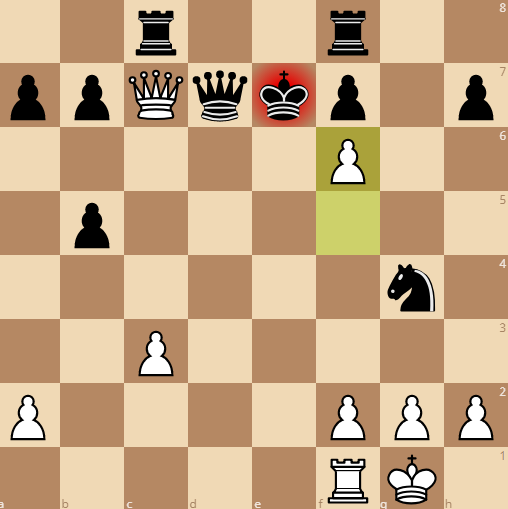
7. dxe5 Nxe5 8. Nxe5 dxe5 9. Qh5
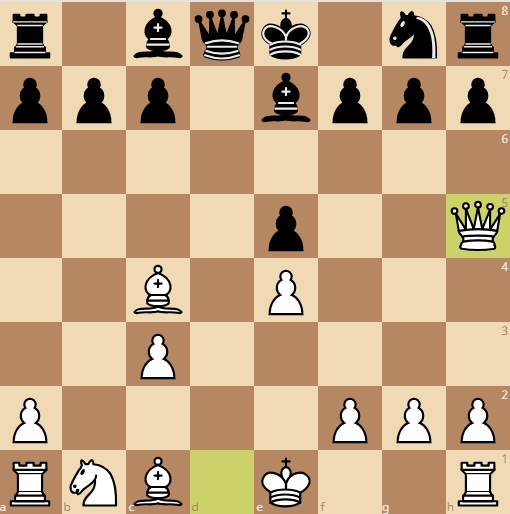
After trading and opening the center, white has removed black’s only developed piece besides the passive dark squared bishop.
Rather than an attack on f7 with the queen on b3, white has gone into a more forceful variation where the queen captures f7 first. This is a more deadly check.
Black has to weaken the kingside structure.
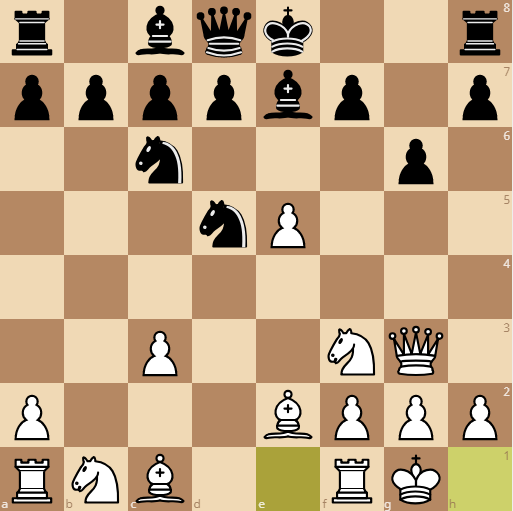
g6 10. Qxe5 Nf6 11. Ba3
We’re seeing some common themes from the 6…Ba5 variation, but with a much more active queen. Ba3 stops black from castling and the knight on f6 is pinned.
11…Rf8 12. O-O Ng4 13. Qg3 Bxa3 14. Nxa3

Even though white’s pieces are strangely placed, white is now fully developed. Black on the other hand has:
- Weakened the kingside pawns
- Created holes on the dark squares
- Not moved the queen yet
- Cannot castle kingside
- Has not fully developed
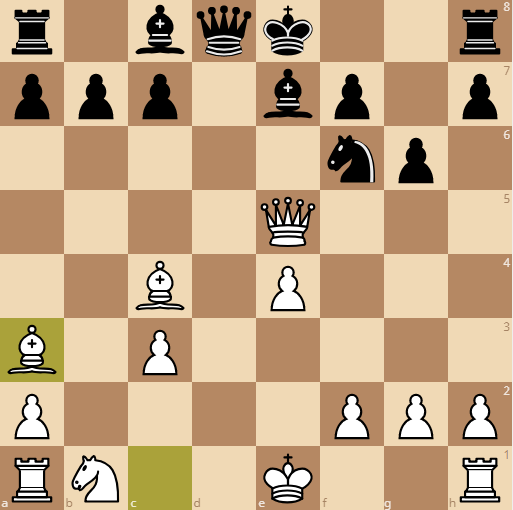
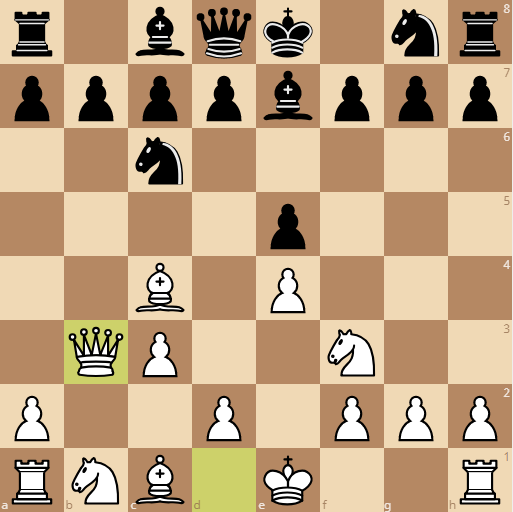
14…Qe7 15. Bb5+ c6 16. Nc4 Qe6

When the queenside knight moves to a3, often the best square is c4. In this case, white has moved the bishop that was occupying the key c4 square with tempo. Additionally, black weakened the d6 square by blocking check with c6.
Capturing the bishop on b5 now will lead to a similar position that Bobby sets up in the next few moves.
17. Rad1 cxb5 18. Qc7 Bd7
Taking the knight here leads to Rd8 checkmate.
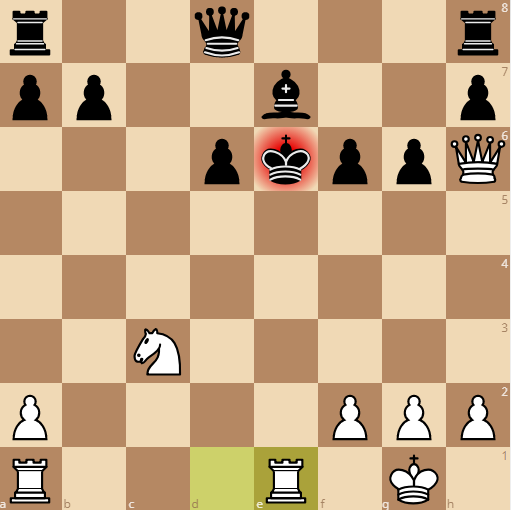
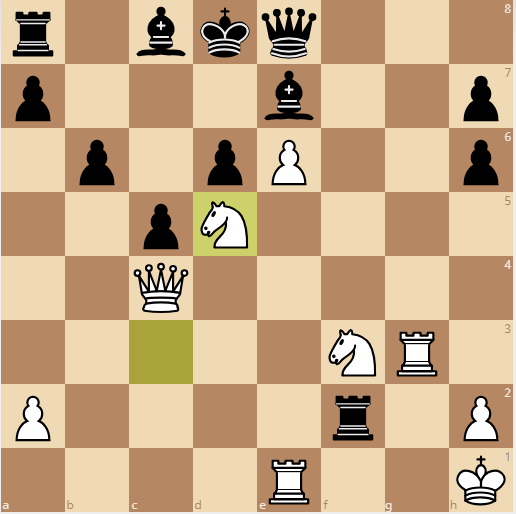
19. Nd6+ Ke7 20. Nf5+
If black doesn’t take the knight, then Ng7+ wins the queen.
20…gxf5 21. exf5 Rac8
Black cannot move the queen to any safe squares, so black attempts to counterattack the white queen. This leads to a beautiful maneuver of tactics.
22. Rxd7+ Qxd7 23. f6+
If Kxf6 then QxQ, winning the queen.
Nxf6 24. Re1+
The same idea. Black is forced to give up the queen.
24…Ne4 25. Rxe4+ Kf6
And white wins the queen anyway. The c3 pawn ends up blocking any backrank checkmate ideas.
Louis De la Bourdonnais vs Boncourt 1836
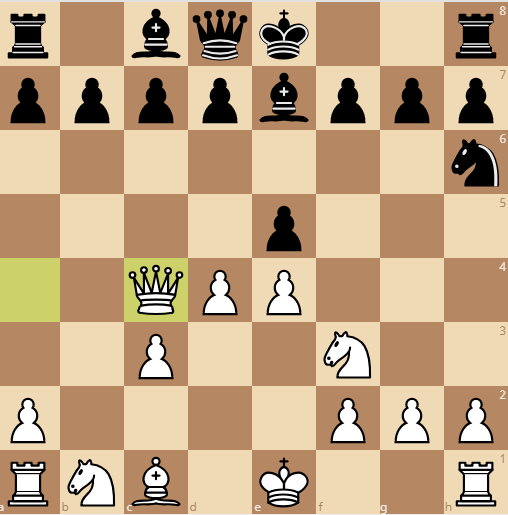
1. e4 e5 2. Nf3 Nc6 3. Bc4 Bc5 4. b4 Bxb4 5. c3 Be7 6. Qb3
The next variation focuses on White following up Be7 with an immediate attack on f7. Note that d4 was necessary to prevent Nh6, which overprotects the f7 pawn.
Na5 is not immediately accurate because white captures f7 with check. This leads to an equal material game where black’s king position is weakened.
Nh6 allows black to castle earlier, but the eventual d4 means the g file may open up against black’s king if he does castle.
6…Nh6 7. d4 Na5 8. Qa4 Nxc4 9. Qxc4
A common trade when the bishop and queen are on b3 and c4. White has a stronger center, but is not as active as other variations. There is also no immediate threat against black.
9…exd4 10. Bxh6 gxh6 11. cxd4
White achieves the ideal center and can develop the knight to c3, as opening principles advise. Black has some compensation for the open g file and can bring the rook to create counterplay against the white kingside.
11…Rg8 12. O-O d6 13. Kh1 Qd7 14. Nc3
Because black is underdeveloped, and the dark squared bishop is not optimally placed, the threat against white is minimal on the g file right now. This gives white time to create other plans.
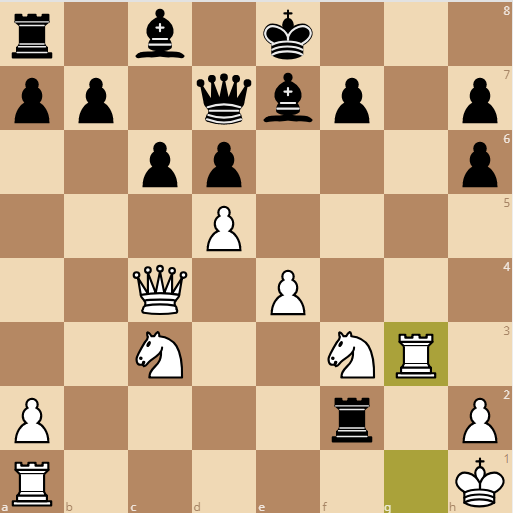
14…c6 15. d5 Rxg2
A sacrifice of the rook that will lead to a forced mate in 5 if white accepts the offer.
16. Kxg2 Qg4 17. Kh1 Qxf3 18. Kg1 Bh3 19. (any move) Qg2#
16. Rg1 Rxf2 17. Rg3
17…c5 18. e5 b6
Black needs to develop the light squared bishop somehow. Weakening the queenside further is the only feasible way.
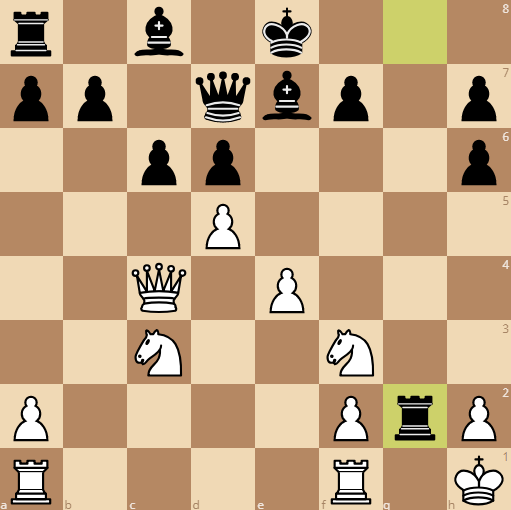
19. Re1 Kd8 20. e6
An excellent grab of space for white.
20…fxe6 21. dxe6 Qe8 22. Nd5
White’s knight is now in the optimal square. It blocks any counterplay black may have on the light squared diagonal and controls a lot of space.
22…Bb7 23. Reg1 Bxd5 24. Qxd5 Kc7

Black gives up the light squared bishop and has no attacking chances.
The rooks have been disconnected and out of place the entire game.
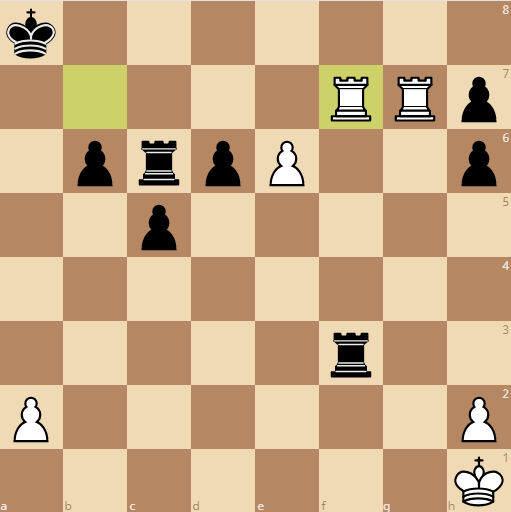
25. Rg7 Rc8 26. Rf7 Kb8 27. Rgg7
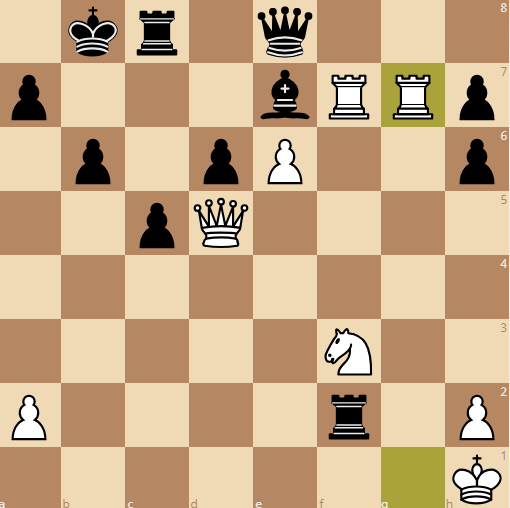
While black has manually castled, it hasn’t done anything of value.
White has grabbed the 7th rank with both rooks and creates mating threats on the weakened b7 square.
27…Qc6 28. Qxc6 Rxc6 29. Rxe7 Rxf3
Equal material does not make for an equal position. White’s rooks are too powerful and a forced win is coming.
30. Rb7+ Kc8 31. Rxa7 Kb8 32. Rab7+ Ka8 33. Rbf7 { Black resigns. } 1-0
This maneuver of rooks is fantastic and forces the win.
If the king moved to c8 instead of a8, the result would have been the same.
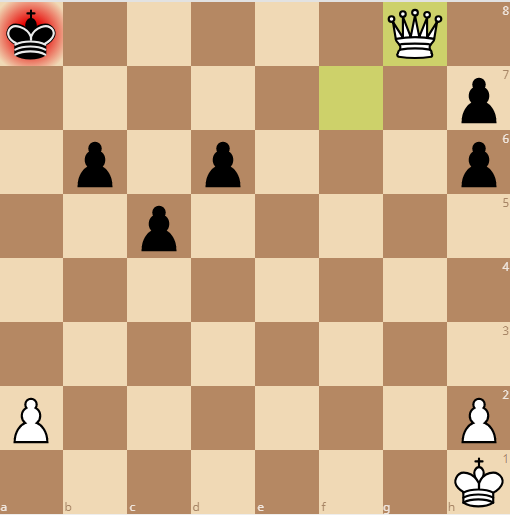
The key here is to threaten checkmate and forces black to trade rooks, which leads to an extra queen after
33…Rxf7 34. Exf7 Rc8 35. Rg8 Rxg8 36. fxg8=Q+
Will you Try the Evan’s Gambit?
I hope you enjoyed these variations and the entire Evan’s Gambit theory lines. If you see any refutations, please let me know.
While the Evan’s Gambit is one of the most aggressive openings for white, it is not completely winning for white if black knows what to do.
Do you plan to try the Evan’s Gambit? If so, send me your PGNs and I can analyze them! I may even add your game to one of these articles on the Evan’s Gambit.