The Ruy Lopez is one of the most popular chess openings. It follows chess opening principles in which each side attacks the center and develops their pieces.
This article will look at some of the most popular variations of the Ruy Lopez so you’re more equipped to know what’s coming.
We’ll also look at common traps that can appear in the opening.
Let’s get started.
What Does the Ruy Lopez Look Like?
1. e4 e5
To continue developing our most logical piece, we bring our knight to f3 to attack e5. This will bring us one move closer to protecting our king and castling.
2. Nf3 Nc6
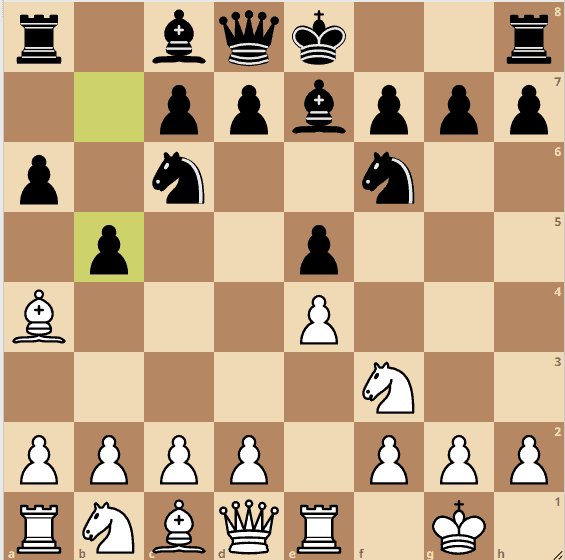
To complete the Ruy Lopez opening, we bring our bishop to b5 and threaten to attack the knight on c6.
Fundamentally, this forces black to make a decision about how they will protect their e5 pawn. If they protect it with something like d6, white can capture the knight on c6 and double black’s pawns.
Very few games occur at the highest level with white capturing the knight on c6 so quickly. White loses all semblance of an advantage right away and the game is much more equal right off the bat.
In the grand scheme of openings, this is not a huge detriment to black’s game and should not in any way deter you from playing this way as black.
3. Bb5
Ruy Lopez Opening Variations
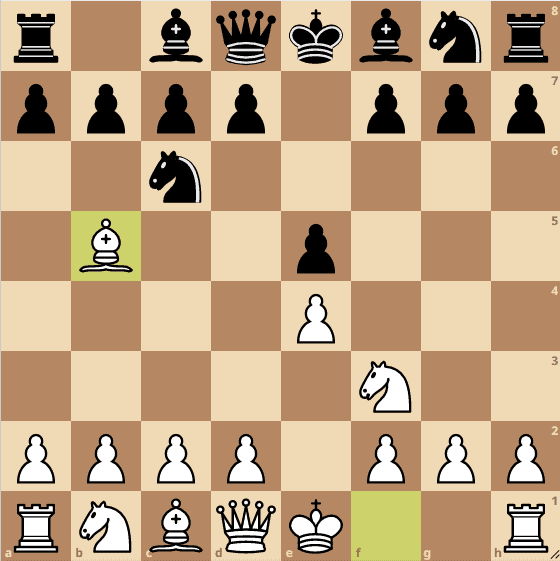
The Bird
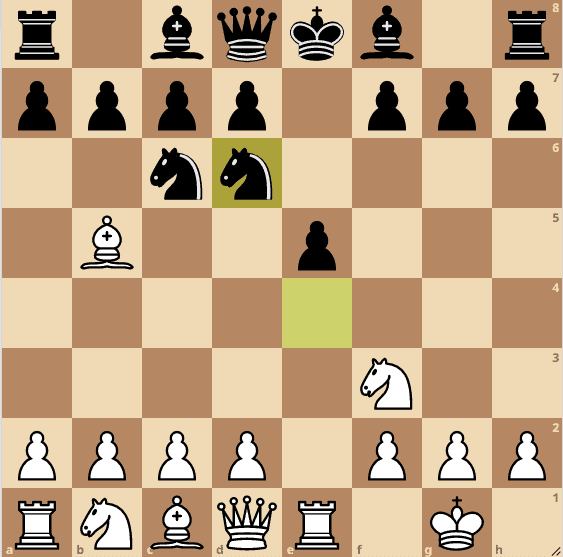
1… Nd4
The bird is a variation you may see when black prefers not to take any chances having doubled pawns on the c file. Black does have a high chance of doubling the d pawns, but this d pawn can make it tougher for white to develop.
An immediate decision must be made by white: where does the bishop go?
Black is forcing a trade no matter what, which is why you won’t see this too often at the highest level. Most GMs avoid trades, but there may be situations where one side wants a draw and by having less pieces immediately, there’s a high chance of this occurring.
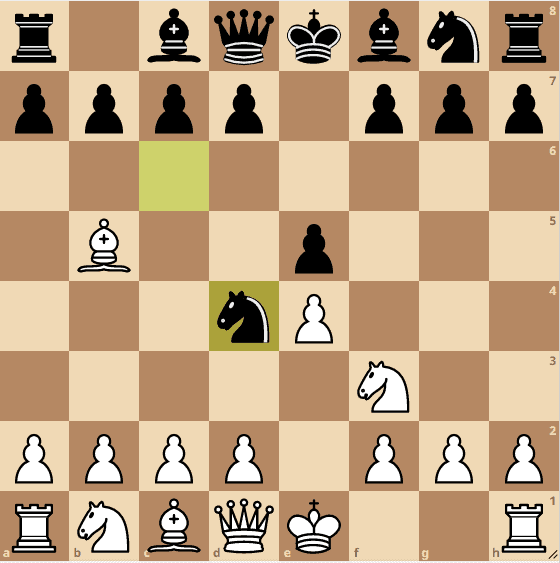
The most popular continuation is Nxd4, preserving the bishop pair and forcing doubled d pawns.
2. Nxd4 exd4
Most popular in this instance is to castle and get on with development. The question becomes where does the queenside knight go?
3. O-O Bc5
Most games occur with black developing their dark-squared bishop.White should get on with development and play d3, saying to black, “well your bishop is now stuck staring at the d pawn.”
Most common continuations are to play d3 and continue developing, or Bc4 to get the light squared bishop to a better square.
4. d3

Steinitz Defense
1… d6

The Steinitz Defense is marked by d6. Wilhelm Steinitz was the first world chess champion.
The best way to counteract this move is to play in the center directly with d4.
2. d4 exd4
Both Nxd4 and Qxd4 are main lines and both can be played. With the knight on c6 pinned and the eventual capture of the knight after the bishop develops to d7, white’s queen is perfectly fine in the center and controls the dark squares, limiting the dark-squared bishop.
Let’s capture with the knight.
3. Nxd4 Bd7
After blocking the pin, the most natural continuation is to develop the knight on c3. This opening may result in massive trades and is less common among higher players.
4. Nc3 Nf6

Castling is the most logical continuation and white has completed their development.
5. O-O
Morphy Defense, Modern Steinitz
1… a6
The Morphy Defense is a variation of the Steinitz and the Berlin (which we will see later).
a6 is a natural move in the Ruy Lopez as it forces white to make a decision.
The best diagonal for the light squared bishop is the a2-g8 diagonal, so it wants to move to b3. a6 in some ways helps accomplish this, but it can also lead to a trapped bishop if you’re not careful.
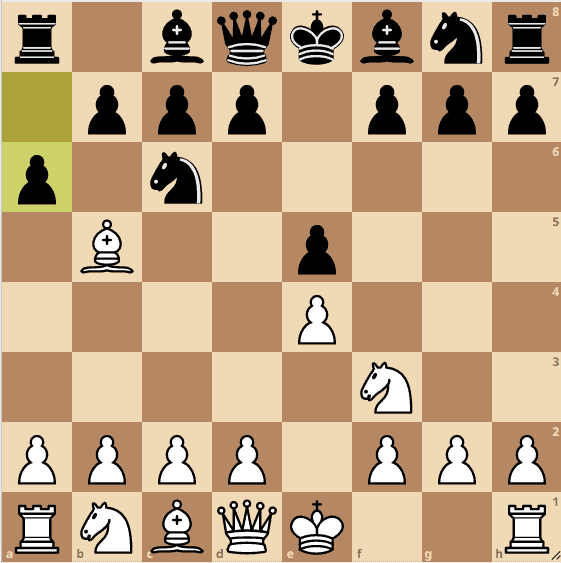
2. Ba4 d6

This is where the game becomes a modern Steinitz. The combination of a6 and d6 gives white a lead in development but controls a lot of squares.
White’s main options here are:
c3, to give a square for the bishop on c2 if it gets attack by the knight.
0-0 to continue development and protect the king.
Bxc6 to put a permanent dent in black’s pawns and force another pawn move very early.
Let’s look at the last option here.
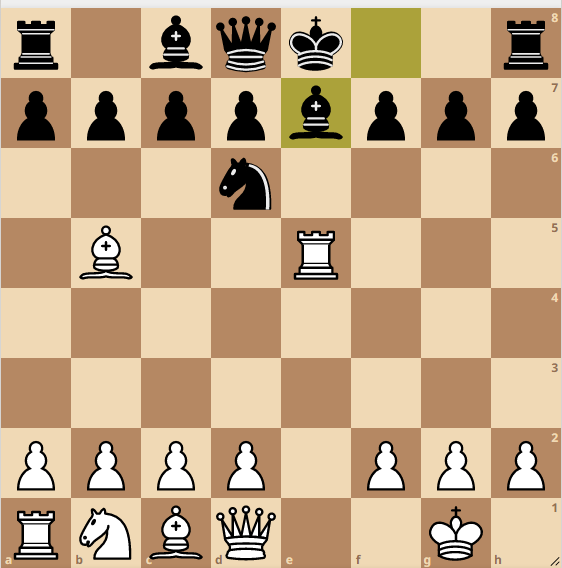
3. Bxc6+ bxc6
White has given up the bishop pair, but it’s important to develop quickly and maintain pressure on the underdeveloped opponent with a thrust in the center.
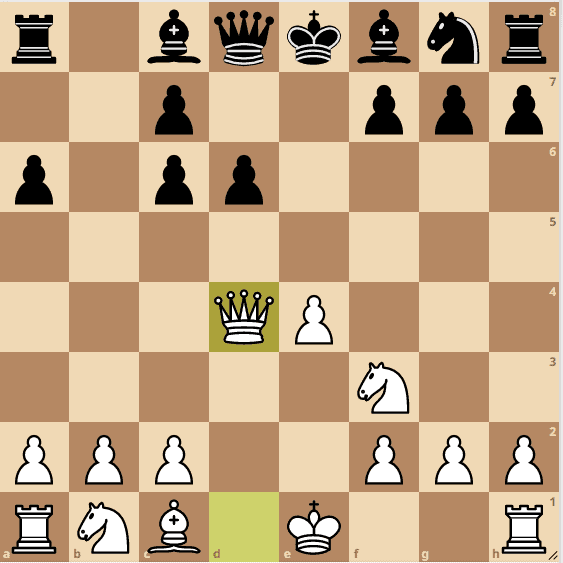
4. d4 exd4
Without the knight on c6, the queen taking the d4 pawn is more aggressive and can’t easily be pushed.
5. Qxd4
Closed Ruy Lopez
1… a6
We looked at the Morphy Defense, Modern Steinitz. Let’s play out some of the main moves to move into a closed Ruy Lopez so we learn the ideas.
2. Ba4 Nf6
Black is not opting to attack with b5 and get the bishop on the a2-g8 diagonal yet.
Instead, black threatens nxe4 right away.
Note that with the white king in the center, Bxc6 is not going to win the e5 pawn because of Qd4. We should get out king to safety.
Even if black captures the e4 pawn (we will see in the Berlin Defense) then white gains an open e file with black’s king in the center.
3. O-O Be7
Now we need to defend the e pawn. The pawn structure dictates that we should do so with our rook.
We want to play d4 at some point, and we also want to keep c3 as an option.
The queenside knight rarely develops to c3, but instead finds a home on d2.
4. Re1 b5
Now we are forced to b3.
5. Bb3 d6

We’ve reached a position similar to the Morphy Defense, but with a few slight variations.
Main continuations here are:
c3 to challenge the center with d4.
a4 to challenge the queenside pawns.
h3 to prevent Bg4, reacting to black’s last move.
6. c3
Breyer
1… d6
The closed Ruy Lopez often means each side must slowly maneuver their pieces.
One way black does this is with the Breyer in which their knight moves back to b8 and then to d7. The knight is undeveloping, but it’s finding a better square.
Continue with c3 to attack the center.
2. c3 O-O
Prevent the annoying pin on g4.
3. h3 Nb8

Black is initiating the Breyer and we can continue attacking the center with d4.
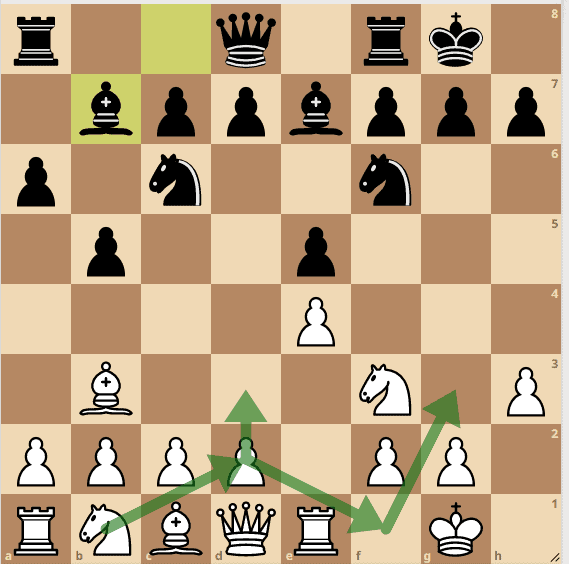
4. d4 Nbd7
Black changed plans with the Breyer so he could play c5 and start a quenside expansion. Relocating the kngiht to d7 helps accomplish this.
5. Nbd2
Marshall Attack
1… O-O
This variation follows after black castles instead of playing d6 in the closed Ruy Lopez.
Black has a very popular gambit known as the Marshall Attack depending on white’s next move. Let’s go into the gambit with c3, the most natural move.
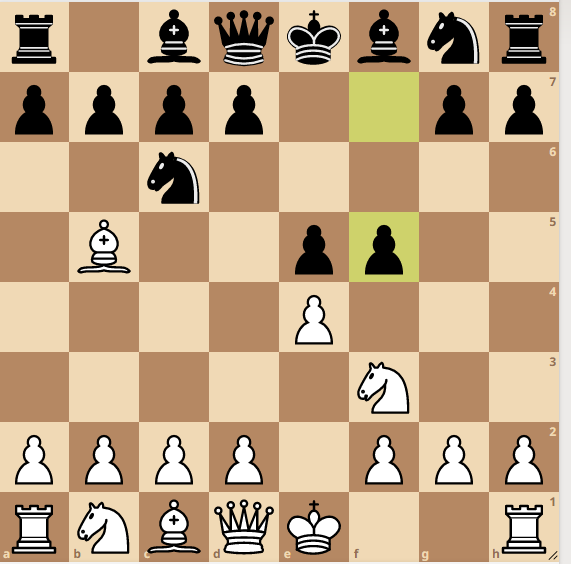
2. c3 d5

The point of skipping d6 is clear. Black played to d5 right away in one move and gives up a pawn. Let’s capture.
3. exd5 Nxd5
We can now win the pawn on e5 for free.
4. Nxe5 Nxe5 5. Rxe5 c6

Black creates a ton of pressure on white’s kingside for the sacrifice of the e5 pawn. Bd6 and Qh4 are coming with a lot of pressure on the kingside.
Anti Marshall 1: h3
1… O-O
If you’re playing against the Marshall attack and finding yourself in a lot of troubles, you’re not alone.
Both h3 and a4 are considered Anti Marshall Openings.
Let’s play h3.
2. h3 Bb7
Playing h3 seems silly considering black hasn’t even played d5 or d6 yet. However, the g4 square can be controlled by the knight or bishop and it becomes very annoying for white.
Playing prophylactically can help to avoid unnecessary variations.
White’s goals now are to play slower and work towards an advantage while developing pieces.
Most common is to play d3, keeping black’s light squared bishop stuck behind white’s light pawns, followed by the queenside knight’s development to d2-f1-e3 or g3, then f5.
Anti Marshall 2: a4
1… O-O
a4 is the second Anti-Marshall opening, and it looks just as strange.
2. a4 Bb7
Our goal with a4 is to directly challenge the queenside pawns, while also giving a free square for the light-squared bishop on the a2-g8 diagonal.
We can then continue with the same ideas as we saw with h3 in which we develop our queen side knight after d3.
3. d3

Berlin Defense 8…Bd7
1… Nf6

The Berlin Defense is one of the most well-known variations of the Ruy Lopez. It is considered theoretically drawn from the opening and many top-level GMs avoid it.
To enter the Berlin, play 0-0 and give up the e4 pawn temporarily.
2. O-O Nxe4
We can enter the Rio Gambit with Re1, but to continue with the Berlin, play d4.
3. d4 Nd6
Black challenges our bishop so we must move it. Let’s capture the knight.
4. Bxc6 dxc6
Black captures with the d pawn to open up the light-squared bishop, but it forces a queen trade and black cannot castle.
5. dxe5 Nf5

Exchange queens.
6. Qxd8+ Kxd8

This move order signifies the famous Berlin Endgame. It has been reached by many masters and is important to study. There are a lot of tactical shots, but many players think of it as a boring endgame.
Black has given up the right to castle but has the bishop pair. Additionally, white’s bishop doesn’t have many good squares because of the pawn on e5 being on a dark square. This limits its mobility.
There are a lot of main ideas for white here and they depend on which course black takes.
Let’s play Nc3.
7. Nc3 Bd7

With this move, Black doesn’t want his king in the center on e8. He wants to navigate to b7 to gain shelter for the king.
A common move for white is to play h3, then g4, move the knight to the center with nd4, then play f4, protecting the advanced e pawn.
8. h3 h6
White can continue on with the same plan, but also develop the dark squared bishop on the long diagonal with b3 then Bb2.
9. b3 Ne7 10. Bb2
Berlin Defense 8…Ne7
1… Kxd8
Let’s look a formation you should strive for after nc3.
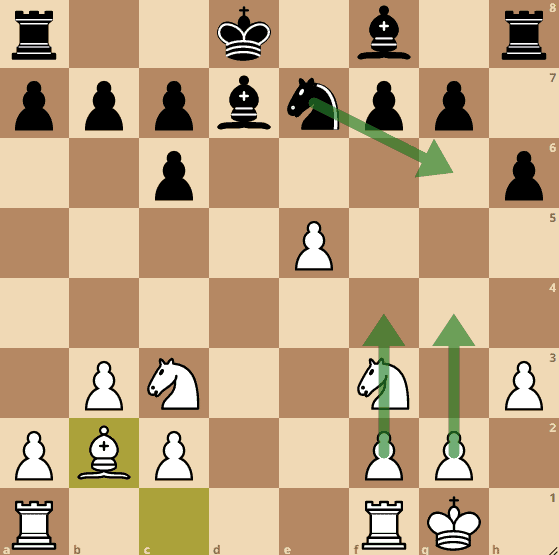
2. Nc3 Ne7

Black sometimes plays the knight back in order to move to g6. We can still play h3 in the same fashion.
3. h3 h6
Black prevents the annoying ng5, but we can now continue developing and keep our knight in the center since the knight moved.
4. Be3 Ng6

We can develop our queenside rook with tempo.
5. Rad1+ Ke8
Prevent the dark squared bishop from pinning your knight.
6. a3 Be7
Now we can reach the ideal position with Rfe1. This formation is not winning or a main edge for white, but it is an ideal position you’ll want to strive for to keep the most potential for your advantage.
7. Rfe1
Rio Gambit
1… Nf6
The Rio Gambit is for players who want to avoid the Berlin and play a sharper opening. Continue with 0-0.
2. O-O Nxe4
Now, instead of d4, we can play Re1.
3. Re1 Nd6
Black can’t play d5 to protect the knight because white would force the knight away with d3 and gain a developing move for the dark-squared bishop on c1.
We can capture the pawn and now we have an open e file with the king still in the center.
4. Nxe5 Nxe5 5. Rxe5+ Be7
Best now is to bring the bishop back to the king’s safety on f1 and possibly fianchetto if needed.
Schliemann Defense
1… f5
The Schliemann Defense may catch you off guard. Black asks white to decide whether or not to they want to play passively with d3, and possibly allow black to have space with f4.
Most common is Nc3 so if black captures they will have the ideal pawn set up with e5 and d5, but white is more developed
2. Nc3 fxe4 3. Nxe4 d5

It looks like black achieved the ideal formation, but white can capture the e5 pawn right away thanks to the pin on c6.
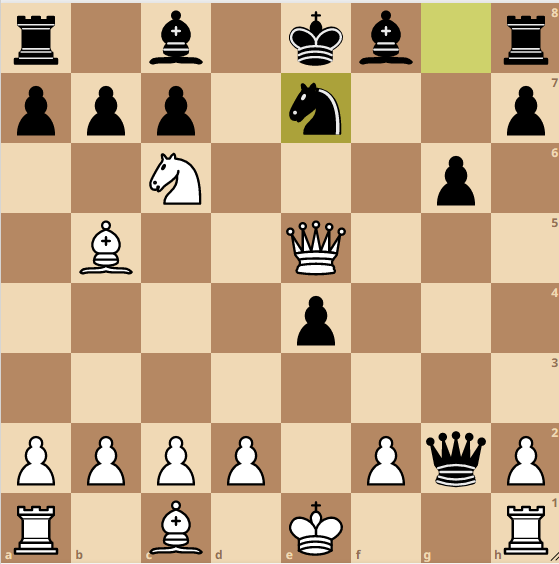
4. Nxe5 dxe4
We can capture the knight back on c6 thanks to the possible fork of king and rook if black recaptures.
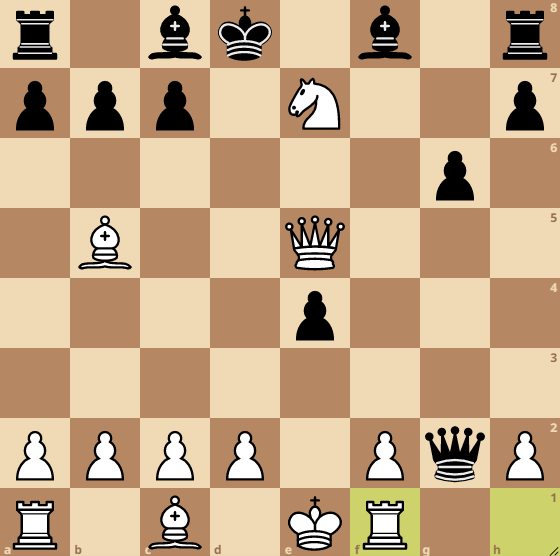
5. Nxc6 Qg5

Black still cannot capture the knight so we can defend our bishop with Qe2.
6. Qe2 Qxg2
A quick trick to note. Black is not threatening to win the rook. White can win right away if black takes the pawn.
7. Qh5+ g6
Continue the attack.
8. Qe5+ Ne7
We have a discovered check.
9. Nxe7+ Kd8
Now we just need to save our rook.
10. Rf1
White is now ahead a piece, black cannot castle, white is super active, and the rook on h8 is hanging.
Cozio
1… Nge7

In this scenario, black is protecting the knight on c6 from being captured and messing with the pawn structure in any way.
The main plan of this is for black to play bg7, d5, and open the diagonal.
However, this plan is slow and white should begin developing right away to counteract this.
Nc3 is recommended and white scores the best with this variation. There is no need to play the common c3 followed by d4 as white can strike in the center more quickly with d4 right away since black is choosing a slower development route.
2. Nc3 Ng6
We should strike in the center with d4.
3. d4 exd4 4. Nxd4 Bc5
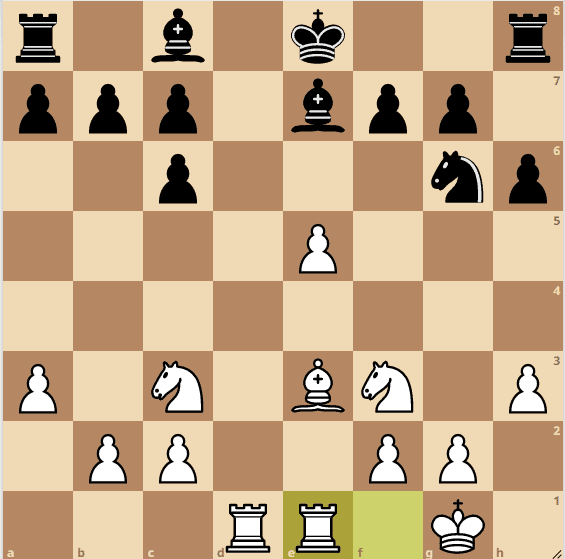
Finish your development.
5. Be3 Bxd4 6. Bxd4 O-O

White can simply castle here and maintains a favorable, though only slight edge.
Castle to move on to the next lesson.
7. O-O