This is the first variation of three that stem from black’s fifth move of the Evan’s Gambit Accepted.
If you found this variation first, it’s important that you read the main ideas of the Evan’s Gambit first.
That being said, the Ba5 variation of the Evan’s Gambit is the most common variation you’ll encounter playing as white, so we have a lot to cover.
Let’s get started.
- Move 6 Variations
- Move 7 Variations
- 5…Bc5 Variation (McDonnell Defense)
Table of Contents
Move 6 Variations
Here is the main move order and why as a refresher
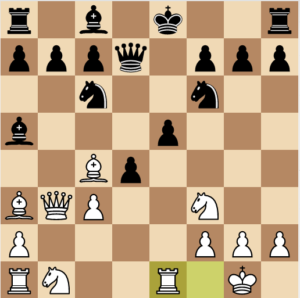
1. e4 e5 2. Nf3 Nc6 3. Bc4 Bc5 4. b4 Bxb4 5. C3 Ba5
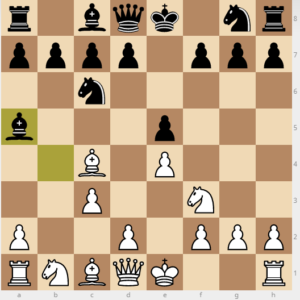
evan’s gambit 5…ba5
Ba5 is a strong continuation for black because it helps prevent white’s attack on the center. The move c3 is a main idea of Guicco Piano, which is another main line of the Italian Game.
The main idea of the Guicco Piano chess opening is to support the attack on the center with d4. Since the bishop is on c5, d4 attacks both the bishop on c5 and the e5 pawn. When you attack two pieces with a pawn, in general the pawn will be taken back, which is where the c pawn comes in to maintain the balance of the center after 6.cxd4.
In this instance, the bishop is not in the center on c4, so the e pawn doesn’t need to take back, but white still must develop towards the center with:
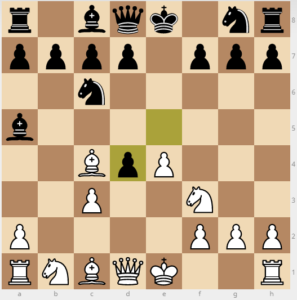
6. d4 d6
The first variation black could play would be 6…d6
This is a solid way to play as black, but less common.
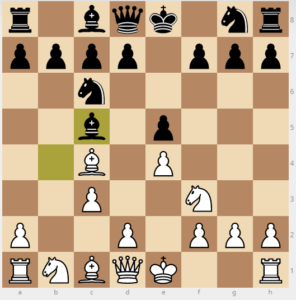
6. d4 exd4
This article will be focusing on what happens if on move 6 black takes the d4 pawn.
The bishop on a5 is maintaining a pin on the c4 pawn, which means the c pawn cannot take the d pawn back. However, I want you to imagine this is the case in all 3 variations we will be studying in this guide because you need to protect your king before you take the pawn back.
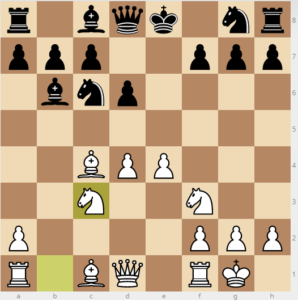
7. 0-0
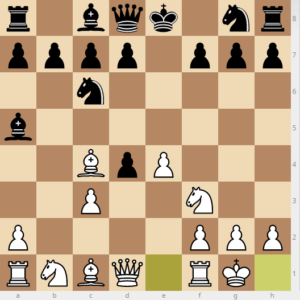
A common theme; white offers another pawn to find safety for the king.
This allows you to now take the pawn on d4 without the worry of check. Black shouldn’t take the c3 pawn with his bishop because trading the active bishop for an inactive knight will lead to trouble as black will only have one developed piece in play.
Sideline: Here’s a game I played where my opponent captured the c3 pawn with his bishop
It’s just too risky to take. White gains more tactical options at his disposal to choose from because of the trade.
We will be breaking off into 4 main variations at this point, each of which you should keep in the back of your mind for this opening. All of them are deadly.
The most popular variations of move 7 for black in the Evan’s Gambit I’ve seen are:
Move 7 Variations of the Ba5 Evan’s Gambit
7…nf6 Variation
Back to move 7 variations
1. e4 e5 2. Nf3 Nc6 3. Bc4 Bc5 4. b4 Bxb4 5. C3 Ba5 6. D4 exd4 7. 0-0 Nf6
In this variation, black is not greedy enough to take the third pawn. Doing so will be an extreme gamble as we’ll see later.
Black is not only attacking the unprotected e pawn, but he is also just one move away from castling. Remember that if black can castle in the Evan’s Gambit, in most cases the position is lost for white (but not always!).
This should be followed up with:
8. Ba3
The main reason is to keep black from castling, but you also develop your bishop. We’re still not concerned about our pawn on c3 because there’s not enough time to worry.
With gambits you usually don’t have a move to waste in the attack.
Black has very few options in this variation, which is why it’s amazing from white’s perspective. Black is almost forced into the next move so that he can castle.
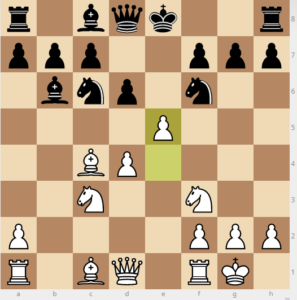
8…d6 9. e5
White is attacking the piece that is blocking black’s king from castling as well as a minor piece. This delays black from castling again.
9…dxe5 10. Qb3

White is again putting pressure on the f7 pawn and black cannot castle yet. Black must defend the f7 pawn in the only way possible. Note that white is down 3 pawns at this point, but has a ton of space on the board.
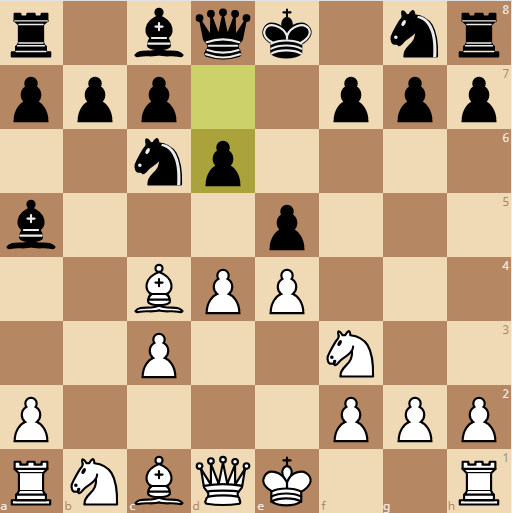
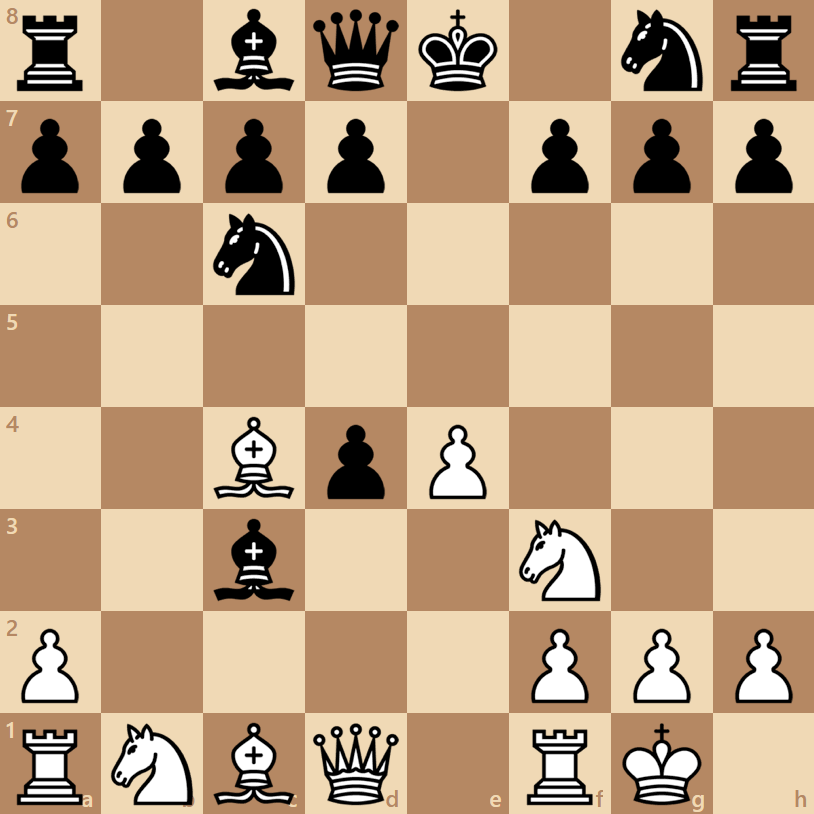
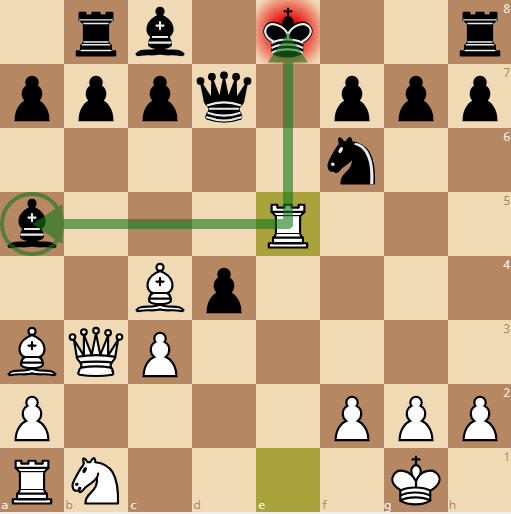
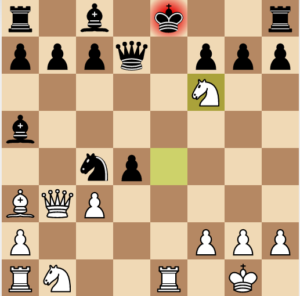
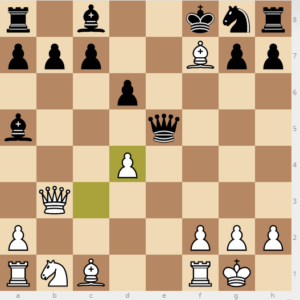
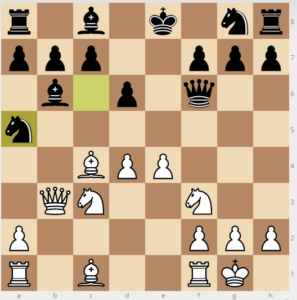
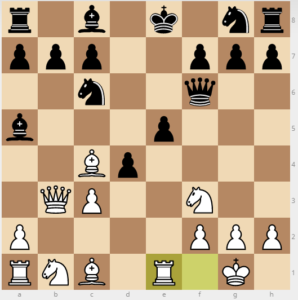
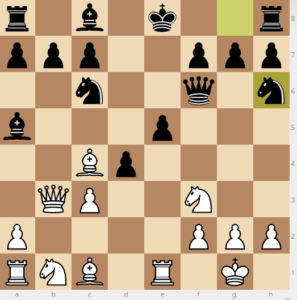
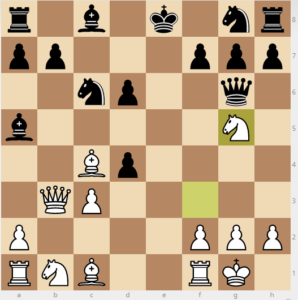
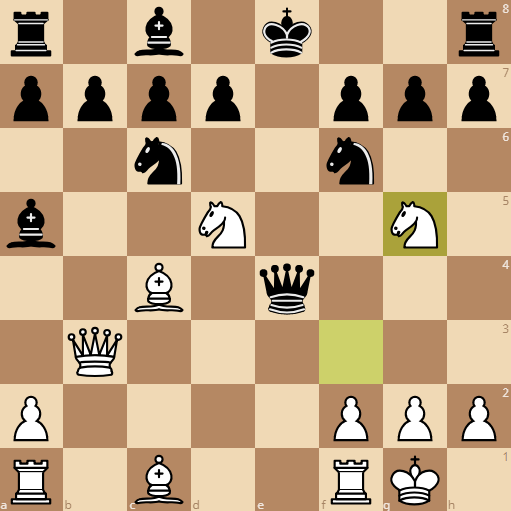
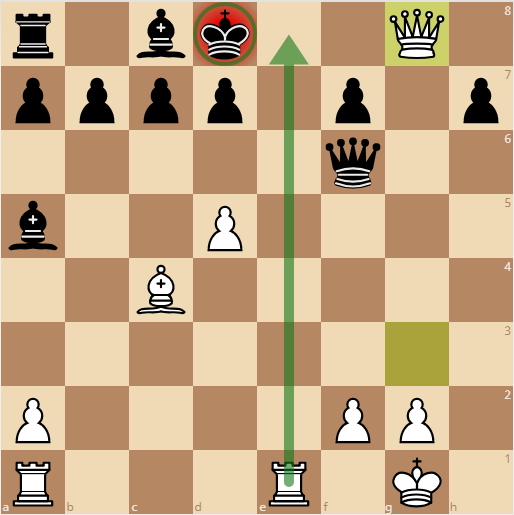
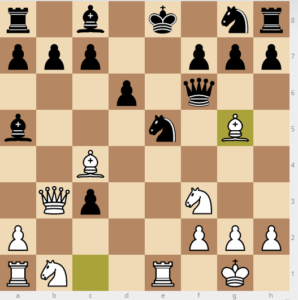
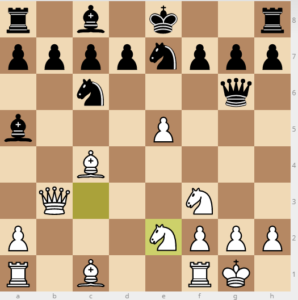
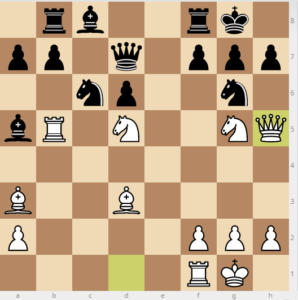
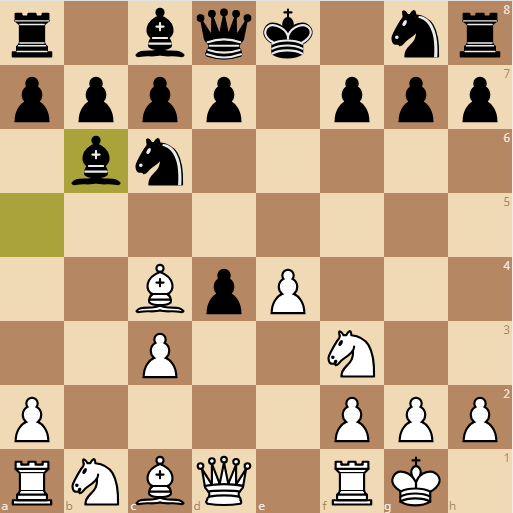
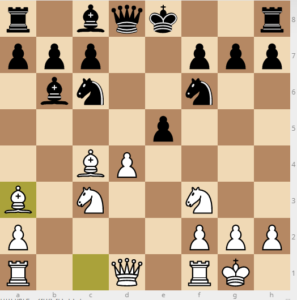
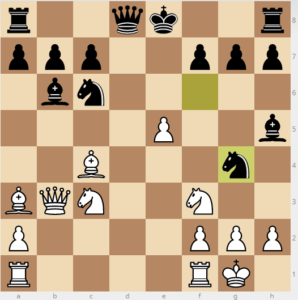
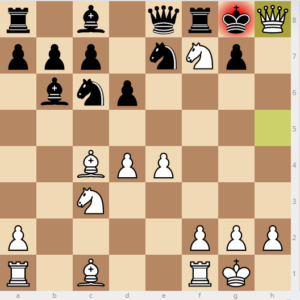
10…Qd7 11. Re1!
Note how the presence of the c3 pawn blocks the bishop on a5 from attacking the rook on e1.
White is now threatening to take the e5 pawn with his knight, opening an attack on the queen and a discovery attack.
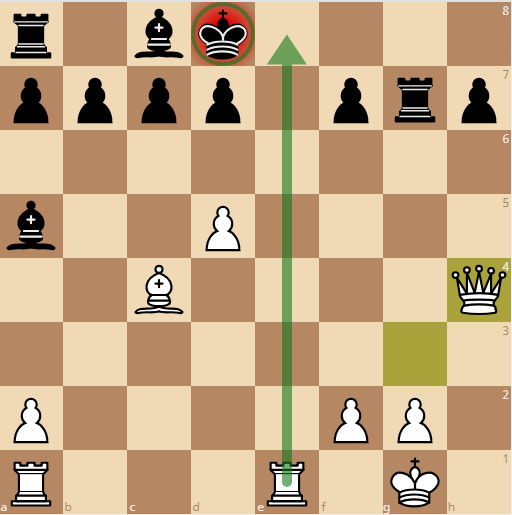
White is threatening 11… ?? (rg8 in image) 12. Nxe5 Nxe5!?
Black will give up the hanging bishop on a5 with Rxe5+!
If the knight doesn’t take the knight back, then White has another attacker on the f7 square which will displace the bishop.
So what can Black play here?
- If 11…Ng4 is played, simply 12. H3 wins the knight or the bishop (after the exchange mentioned above) it’s black’s choice, but a bad one to make.
- If 11…e4 then 12. Ng5 putting another attacked on the f7 square and threatening to take the e4 pawn, opening the discovery attack we mentioned.
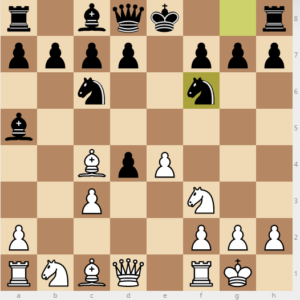
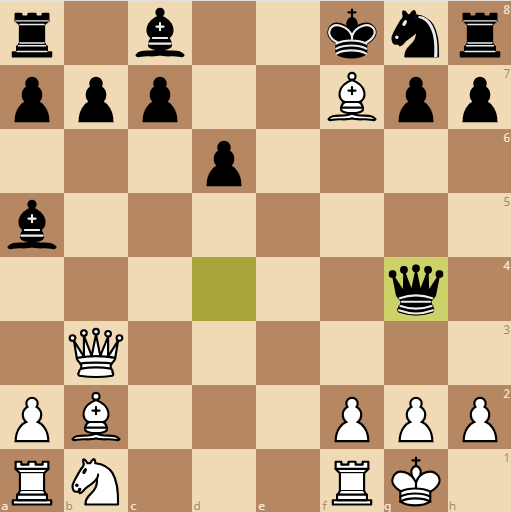
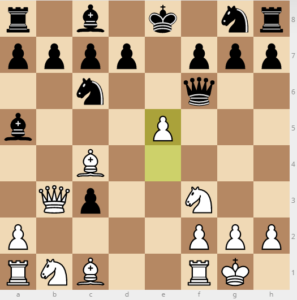
If for example black decides to defend the f7 square with 12…ne5 then:
13. Nxe4 nxc4 14. Nxf6+ with a double check and attack on the queen as seen below.
Black is also blocking in his bishop and rook on the queen side in many Evan’s Gambit variations.
Try to remember the ideas below when your opponent plays this variation:
- The Bishop on a5 must always be protected by black’s knight on c6.
- Try to remove the knight with pressure on the center
- Black cannot move the d6 pawn until the king is safely castled
- The rook on e1 has many discover attack ideas that are hard to block
- This variation clearly wins for white so let’s look at the next variation.
7…d6 Variation
Back to move 7 variations
See Notation Here
1. e4 e5 2. Nf3 Nc6 3. Bc4 Bc5 4. b4 Bxb4 5. c3 Ba5 6. d4 exd4 7. O-O d6

The main idea of this variation is to allow black to develop its light squared bishop and help prevent white from playing e5.
As black has not yet defended against our f7 onslaught, we should take this opportunity to create our threat. Since black’s bishop is on a5, we don’t have to worry about Na5, forking our bishop and queen.
8. Qb3
Move 8 Options for black include:
8…Qd7
This will block black’s light squared bishop again as if the pawn were in the way.
Also, the queen cannot make any threats against the kingside’s light squares on its own.
8…Nh6
While this defends f7, this is not a viable option as the bishop on c1 will gobble it up and remove black’s defender of f7, allowing 10. Bxf7+.
8…Qe7
This is bad for black because of…
9. e5
9…Nxe5 10. Nxe5 Qxe5
If 10…dxe5? Then 11. Qa4+ loses the bishop as we’ve seen. Keep this in mind if the Queen is ever forced away from the d8 square.

We have removed the defender of the queen for f7, so we are safe to attack f7 with check.
11. Bxf7+ Kf8 12. cxe4
The king must protect the knight on g8 so he is forced to block in the rook with Kf8. At the same time, we’ve managed to get back 2 out of 3 pawns in the last 2 moves, and we have removed our opponent’s castling privilege.
While white is still down a pawn, this variation is very favorable for white as they are more developed and black is limited where they can move still.
The queen won’t take back the pawn on e4 or Bb2 is another developing move for white with tempo on the Queen. While white is giving up the pawn again, the threat of an attack on the g7 pawn creates some problems for black.
White can also keep pressure on the f7 square with 13. Bh5 (threatening Qf7# if black takes the rook) 13….Qf6 (defending checkmate) 14. Nd2 (developing and threatening to move to 15. ne4 attacking the queen)
8…Qf6
The most common move for black is 8…Qf6 to defend the f7 square and keep an eye on the a1 Rook, in addition to defense of the d4 pawn.
Since it’s the most common version, Let’s look at Qf6 in depth
Let’s first look at the logical way to play, which leads to an unclear advantage.
Oftentimes, you may want to continue developing normally, but this means you are going against a main idea in the Evan’s Gambit which is each move needs to create pressure for your opponent.
I want to run through this variation and show that it’s not ideal, but it may be a position you find yourself in if you move too quickly and fail to create additional threats for black to deal with.
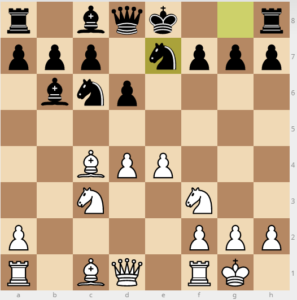
8…Qf6 9. cxd4
A natural and logical move that gets white into trouble; attacking the center and developing, which makes sense. Black’s safest option, being up a pawn, is to try to trade away the white bishop and remove its attack on the f7 square, thus opening up the black queen for movement.
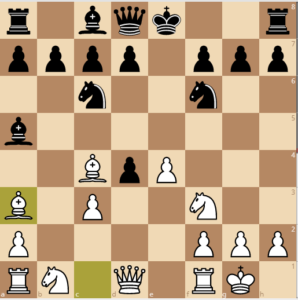
9…Bb6 10. Nc3 Na5
Since the bishop is occupying the a5 square, which is an ideal square for the knight to fork white’s queen and bishop from, the bishop must first move to b6.
After white simply develops and creates a threat of moving the knight to d4, black attempts to break up the queen/bishop threat. White must combat this first.
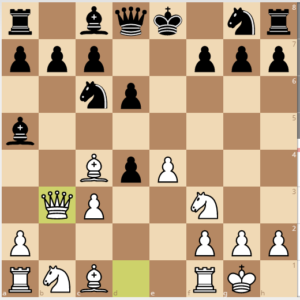
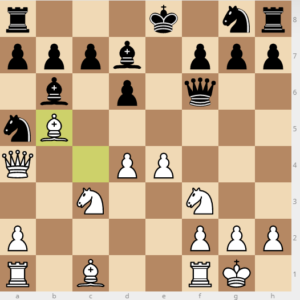
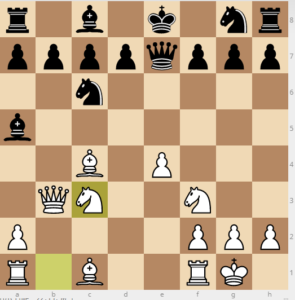
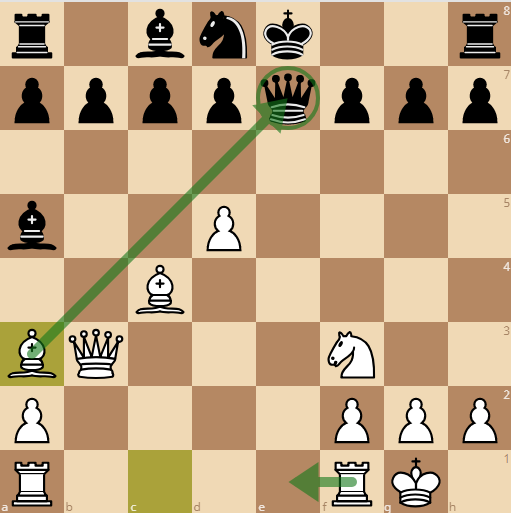
11. Qa4+ Bd7 12. Bb5
The best way now to continue is to check the king, allowing the white bishop to also move.
Here we have a more standard game where white is down a pawn, up in development, but doesn’t have too much else in way of compensation. Pieces will start to be traded and black is fine here.
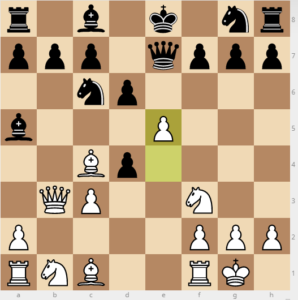
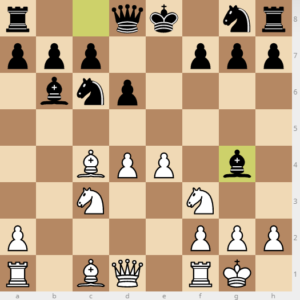
The best variation is to keep the pressure after 8…Qf6 9. e5

-
-
- If the knight decides to take on e5, this will turn into the same variation in the previous section that started with 8…Qe7.
-
9… Nxe5 10. Nxe5 Qxe5 11. Bxf7+ Kf8 12. cxd4
Are you seeing a pattern yet?
We just saw this variation if black played 8…Qe7 and the same variation is absolutely playable. However, we have better options and black moved to Qf7 with a purpose.
-
-
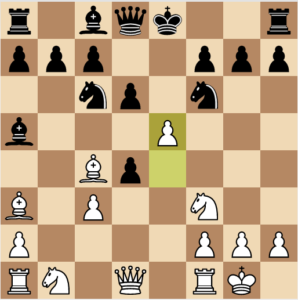
- If the pawn takes back on e5, then Re1 keeps pressure on the e file.
-
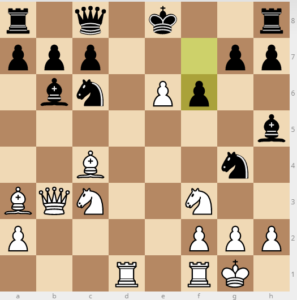
9…dxe5 10. Re1
Note how the bishop is still blocked on the a5-e1 diagonal, allowing the rook a nice, centralized position. Black still hasn’t developed the kingside knight, so there is no castling yet.
10…Nh6
White is planning 11. Bg5, threatening the queen to move from protecting both f7 and e5, the black knight must help defend f7 since no other piece can.
If 10…Be6 then 11. Qxb7 winning the knight.
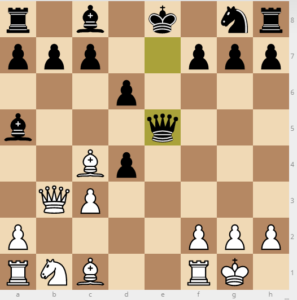
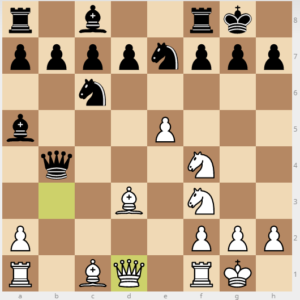
11. Bg5 Qd6
The bishop move comes in and the black queen cannot protect both e5 and f7 anymore. However, this opens up the original idea of why the knight cannot hold f7 while the black bishop is on the board.
If 11…Qg6 then 12. Nxe5, winning the bishop again.
12. Bxh6 gxh6 13. Bxf7+
White regains a pawn and black loses castling abilities. In addition, the kingside is completely opened up and black has doubled up h pawns that cannot easily be held onto with all of his pieces on the queen side.
-
-
- Based on these options, the queen must move. The best move in general is for the Queen to move away, but still control f7, by moving to 9…Qg6
-
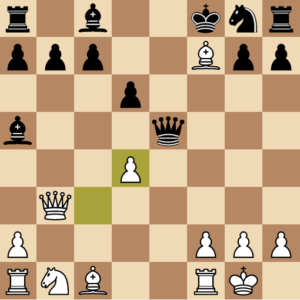
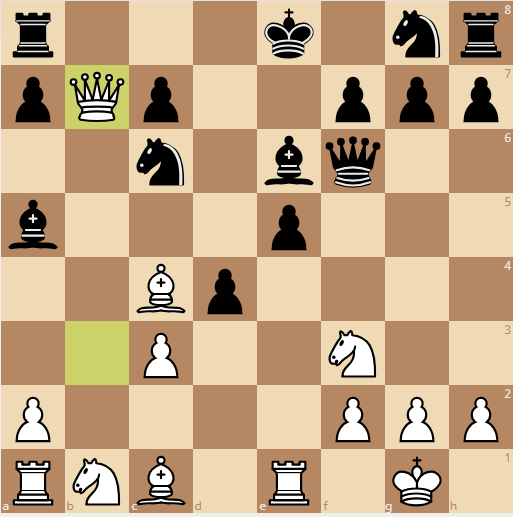
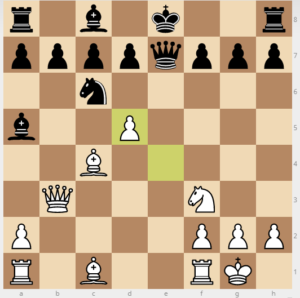
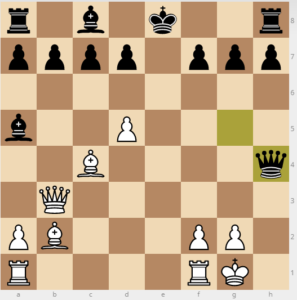
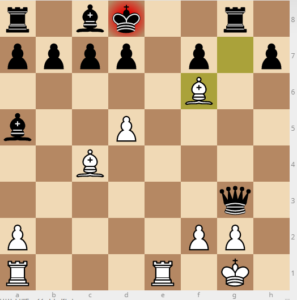
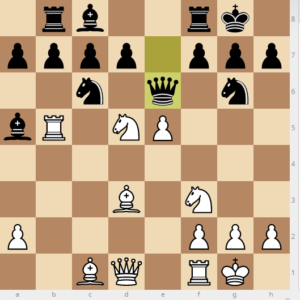
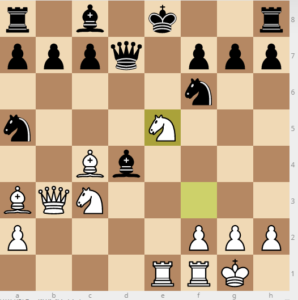
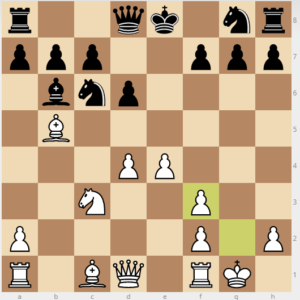
9…Qg6 10. exd6 cxd6 11. Ng5
Putting more pressure on the f7 pawn. Another great option is 11. Cxd4 threatening 12. d5. This allows the possibility we’ve discussed earlier, threatening the a5 bishop and check with the queen.
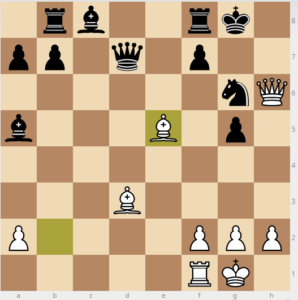
11…Nh6 12. Re1+

And the main goal to prevent black from castling has been achieved. Let’s look at the pawns and position of the game.
-
-
-
- Black has 2 minor pieces on the outside files (a and h)
- Black’s light squared bishop cannot move without giving up the b7 pawn.
- White is two pieces behind in development, but his king is safe
- White still has pressure on the f7 square, almost forcing black to block in his h8 rook. Despite the bishop and knight not being there, black was unable to castle.
- Black is up 2 pawns, but will be unable to hold the e4 and e6 pawns for long
-
-
The position gives white an advantage in my opinion, showing that d6 followed by Qf6 is not the greatest option for black to answer this.
7…dxc3
Back to move 7 variations
The third Ba5 option is for black to retake the pawn on c3, going up 3 pawns.

Probably the most common example I’ve seen, and the greediest. Many players like to keep an advantage in material over a position because, should the attack fail, the material advantage will shine through later on.
However, if you are precise, you can make quick work of your opponent with this greediness, but again you have to be careful.
8. Qb3 is the best follow up to keep pressure on f7.
Bobby Fischer v Reuben Fine 1963 | 8…Qe7
Let’s take a look at why Qe7 is not great for black with a game by Bobby Fischer and Reuben Fine. For the same reasons as the previous variation, these two queen moves are the only moves for black.
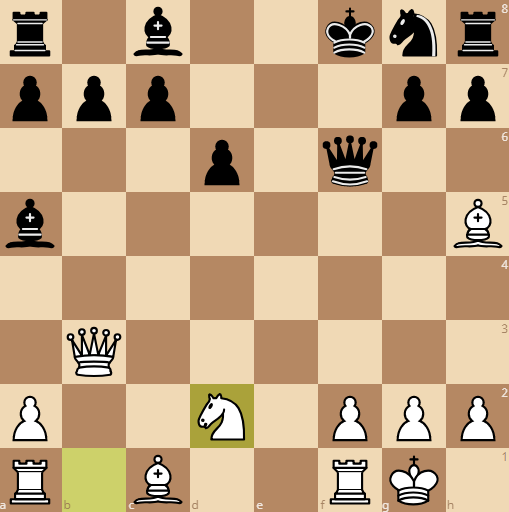
7…dxc3 8. Qb3 Qe7 9. Nxc3
Here black can take the knight on c3 in a different variation, but it makes black’s play troublesome.
If the bishop takes, white will be one move away from fully developing, and can take advantage of the b and d files.
Meanwhile, black is at least 4 moves away from castling.
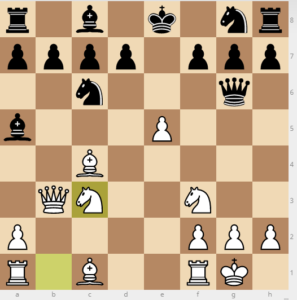
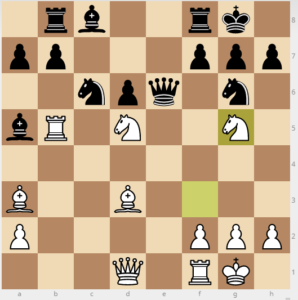
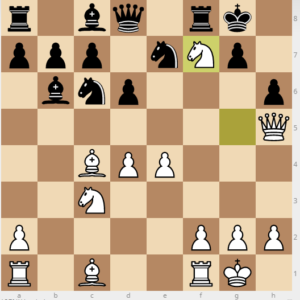
9…Nf6 10. Nd5
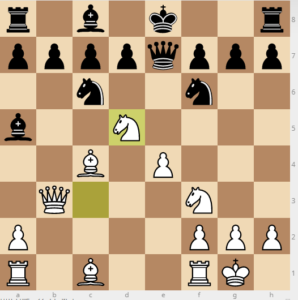
10…Nxd5 11. exd5
If 10…Qxe4 then 11.Ng5 attacking the queen and attacking the f7 square three times after 12. Nxf7
11…Ne5
If 11…Nd8 then simply attack the queen with 12. Ba3. If the queen moves, you have tremendous developmental advantages.
If your opponent blocks with d6, then we see the main threat white should always have in mind which is Qa4+ or Qb5+, capturing the bishop.
The black knight must always be able to protect the a5 bishop, or else this is in the back of white’s mind after the very early 5. c3.

12. Nxe5 Qxe5 13. Bb2

Think about where your queen can go besides g5 and the threats white has. Everything is almost forced for black.
13…Qg5 14. h4 Qxh4
What other options does the queen have?
14…Qg6 is met with Qa3, threatening the bishop and the e7 square if the bishop moves.
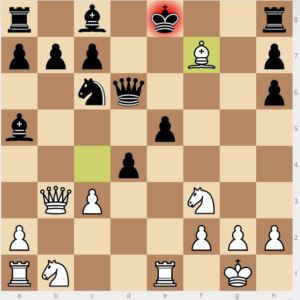
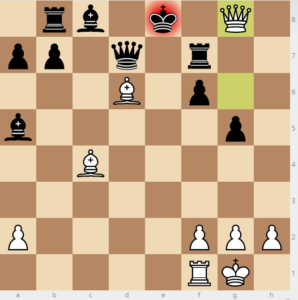
We would see 16. Re1+ followed by mate. The queen needs to continue protecting the e7 square so it must take h4.
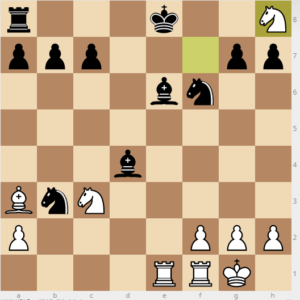
15. Bxg7 Rg8 16. Rfe1+ Kd8

It doesn’t matter which rook checks along the e file, and it doesn’t matter if the bishop takes.
The beauty of finally connecting the rooks means that the Ba5 move doesn’t matter all along. Black’s king must move to its only square, leading to a beautiful finish by Bobby Fischer.
17. Qg3!
If 17…Qh6 18. Bf6+ Qxf6 19. Qxg8#
If 17…Qxg3 18. Bf3#
If 17…Rxg7 18 Qxh4+ and black must block with 18… Rg5 then 19…f6 but it is mate in two after 20. Qxf6#.
Anything besides 17…Qxg3 is met with 18 Qxh4 as the queen is hanging, and thus the game.
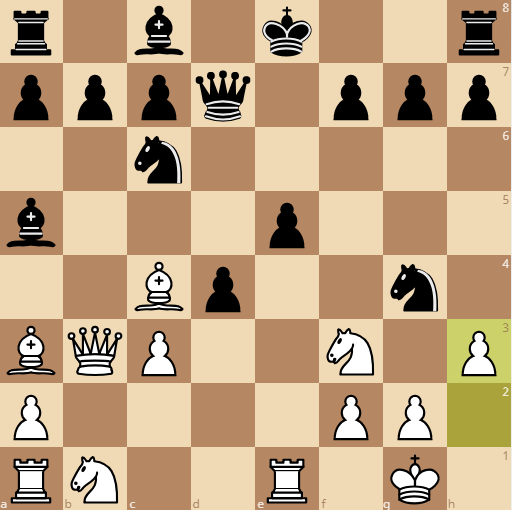
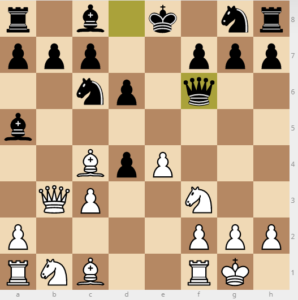
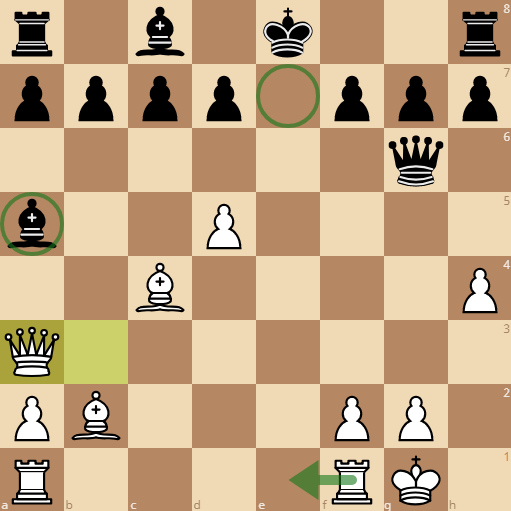
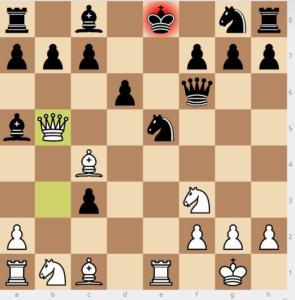
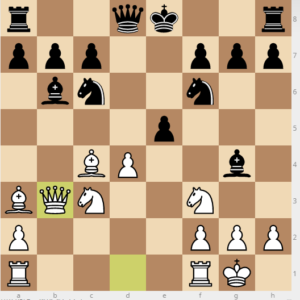
The better continuation for black after 8. Qb3 is 8…Qf6

Things are a little different this time from our 7…d6 version, but pushing e5 is still the best move here. The rook can slide to e1 still because instead of white’s pawn blocking the a5 bishop’s attack on e1, now black’s pawn on c3 is in the way.
This is where things get tricky. Honestly, this is black’s best chance in the Evan’s Gambit if white does not know this continuation.
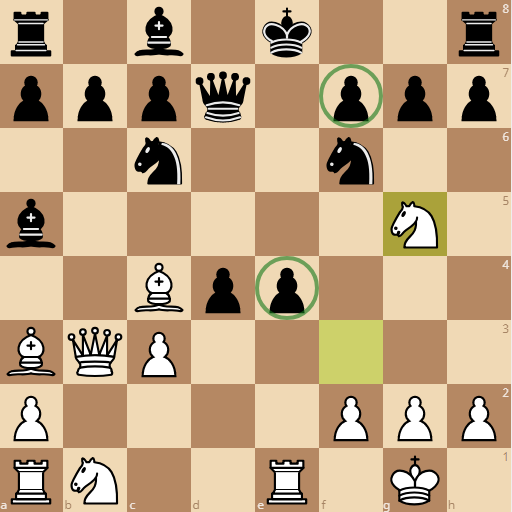
9. e5
Black cannot recapture the pawn as the threat of 10. Re1 is imminent, winning the knight as it is pinned.
If black defends the knight with d6, either 11. Bg4
or 11. Qb5+ (or Qa4+). Both win material.
The Queen must move, and she must continue to protect the f7 square.
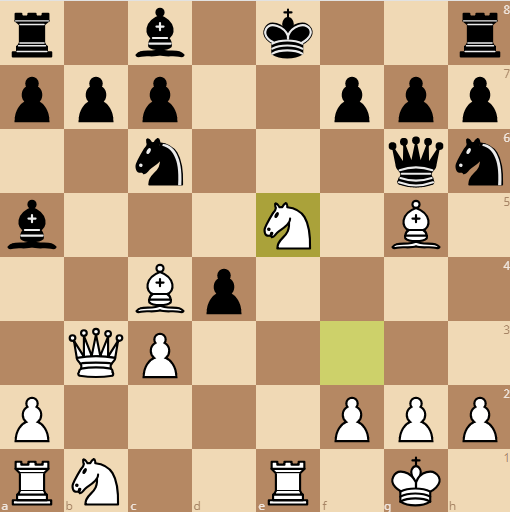
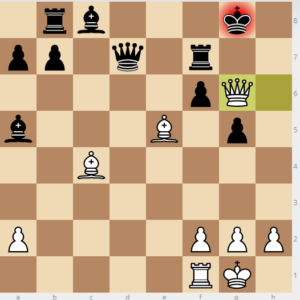
9… Qg6 10. Nxc3
Let’s take a look at the position:
- White is now down 2 pawns instead of 3
- Black has 2 minor pieces undeveloped
- Black has not castled yet
If Black decides to take the knight that was developed, then Black cannot easily move.
Try to find a great move for black.
It is very hard if he takes the bishop as no moves are great in any way.
10…ne7 11. Ne2
Developing a piece as taking the knight with bishop does not help black castle.
11…0-0
It looks like we allowed black to castle. In this very specific situation, it is alright because this opening puts black in such a position that he can be checkmated.
The following situation was presented with GM Gregory Kaidanov’s
explanation of the Evan’s Gambit and it is a beautiful way to approach 8…Qf6 in this variation.
The following series of moves are all logical and revolve around trapping the queen.
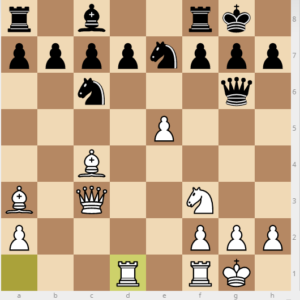
12. Nf4 Qe4 13. Bd3 Qb4 14. Qd1
The black queen must move as it is getting trapped after 15. Rb1. The knight on e7 is limiting the queen to the queenside in the middle of the board so it moves to give the queen more space.
14…ng6 15. Rb1 Qe7 16. Nd5 Qe6 17. Rb5 Rb8
White’s plan to take the bishop on a5 and then use the knight to fork the rook and queen on c7 has been thwarted, so let’s continue developing with pressure with white’s last piece.
18. Ba3 d6 19. exd6 cxd6 20. Ng5
Again, white’s theme of attacking the Queen is seen here. This queen was forced to develop early to save the game. This time, all of white’s pieces are now further up the board and black’s are not in optimal positions.
20…Qd7 21. Qh5
White is threatening checkmate on h7 and black has only one way to block it.
21…h6 22. Nf6+
Forking the queen and king. Black’s only option is to accept the sacrifice and open up the kingside.
22…gxf6 23. Qxh6 fxg5

Black accepts another sacrifice to prevent checkmate. Both of white’s knights are off the board, but the power of the long ranging, and developed bishops, will soon be seen.
24. Bb2

White is threatening checkmate (g7) now on h8 with the long a1-h8 diagonal open. If black blocks with f6, Bc4+ will force the rook to block, giving up the knight on g6. We’ll see how this is forced shortly.
24…Nce5 25. Rxe5

A beautiful rook sacrifice. Moving the rook now threatens checkmate again so it must be taken.
25…dxe5 26. Bxe5
The black knight cannot recapture or it’s checkmate on h7. Meanwhile, white is threatening checkmate on g7 again.
26…f6 27. Bc4+ Rf7 28. Qxg6+
28…Kf8 29. Bd6+
Queen cannot take the bishop on d6 or it’s mate with Qxf7#
29…Ke8 30. Qg8+
And checkmate after Rf8 (Qxf8#)
Rf8 31. Qxf8#
This is such a brilliant maneuver and should not be memorized. However, it is a beautiful sight to see and shows that just making the wrong moves in the opening can lead to a position less favorable for either side.
We have completed all 7…dxc3 variations and they all look favorable with white, as long as careful play is observed. Let’s look at the last variation for 5…Ba5.
7…Bb6
Back to move 7 variations
The Last Variation we will discuss in this guide.
This variation makes way for the knight to come to a5 to threaten the fork of the bishop and queen if the queen comes to b3 (as we’ve seen it loves to do).
Black is also attempting to save his bishop from any potential threats on a5 if the knight on c6 moves away.
The 7th move of the Ba5 variation of the Evan’s Gambit is so similar to the 6…Bc5 variation, so it makes sense to group these two together.
5…Bc5 Variation of Evan’s Gambit (McDonnell Defense)
1. e4 e5 2. Nf3 Nc6 3. Bc4 Bc5 4. b4 Bxb4 5. c3 Bc5
This variation can be transposed into from 5…Ba5 so it makes sense to put these ideas together.
In this variation, the black bishop moves back to c5 to help defend the center. Often the bishop will move back to b6 after the d4 push as follows.
6. d4 exd4 7. O-O Bb6
The best move after this for black is to move the bishop back to bb6. Thus we have the same exact situation as if the bishop had moved to a5 and then b6 on move 7 in the Ba5 variation.
Important
In both variations, I have found that you will ultimately end up in this situation.
8. Cxd4 d6 9. Nc3
See Notation Here
This is a solid position to memorize as white has a strong, ideal center and black doesn’t have many great moves. We’ll look at the three most logical moves next:
Move 9 Variations
- 9…nf6
- 9…ne7
- 9…Bg4
Let’s First Look at 9…Nf6
Back to Move 9 Variations
Here’s the Notation When Bb6 and d6 are played
9…Nf6 10. e5
A similar idea we’ve seen before. White is trying to push the knight around, but also open up the e file and a3-f8 diagonal.
10…dxe5 11. Ba3
Preventing black from castling which matches the idea we’ve seen in the first variations of the Evan’s Gambit accepted.
Black can choose to take the pawn back on d4 with the bishop, but will be met with the following:
11…Bxd4 12. Qb3 Qd7 13. Rae1 Na5 14. Nxe5
Black cannot take the queen on b3, or else he will lose a ton of material as we will see.
14…Nxb3 15. Nxf7+ Qe6 16. Bxe6 Bxe6 17. Nxh8 and white is completely ahead.
However, black’s best bet is to take the queen because moving his own queen will result in discovery check ideas where the knight will move (and the rook will check the king).
Either this or the Queen can escape its attack with a check of its own with 15. Qa4+ attacking the knight.
11…Bg4 12. Qb3
Threatening the usual f7 square.
12…Bh5 13. dxe5 Ng4
Black needed help defending the f7 square, which was the point of Bh5.
The knight has one less square to go to, however as it must go to g4 and threaten the e pawn.
This leaves the black queen with limited spaces to go however. White must cut the queen off from the king.
14. Rad1 Qc8 15. e6 f6
Black’s queen was forced away. Black’s king also cannot castle in either direction thanks to the rook.
16. Qb5 Bg6 17. Bd5

White was threatening the black bishop, forcing it to move, but now white has another threat. The knight is pinned and cannot be saved by any pieces. After 18. Bxc6 bxc6 the black king will shortly be checkmated.
Because of this, we can see that nf6 is bad for black.
If 9…Ne7 is played
Back to Move 9 Variations
This variation is a huge mistake for black players and must be punished immediately.
Often in the 7…Bb6 variation, white is waiting to see where black wants to bring his knight, if anywhere at all. White can’t move the knight to g5 too quickly or black can play Nh6, defending f7.
With Ne7, we can already see black’s bishop is out of play, and the queen cannot come to any of black’s king side pawn’s rescue.
9…Nge7 10. Ng5

Initiating the attack and almost forcing black to castle, or make a bad move with Rf8, leaving the king in the center. Rf8 is not a great move because black is conceding that castling kingside will never be an option. It also limits any squares the black king can run to if it gets into trouble, and weakens the pawn on h7.
10…O-O 11. Qh5 h6 12. Nxf7
Checkmate must be stopped, and without the knight on f6, only disrupting black’s own pawns can be the answer. This, however, leads to 3 attackers on the f7 square.
12…Rxf7 13. Bxf7+ Kh7
Black must give up the exchange along with a shattered kingside to save the game.
Moving the king to h7 is the only answer as 13…Kh8 leads to 14. Bxh6 and a resulting checkmate if black takes the bishop back.
Checkmate will shortly follow if black does not take the knight back with:
12…Qe8 13. Nxh6 Qe8 14. Nf7++ 15. Kg8 16. Qh8#
If 9…Bg4 is played
Back to Move 9 Variations
1. e4 e5 2. Nf3 Nc6 3. Bc4 Bc5 4. b4 Bxb4 5. c3 Ba5 6. d4 exd4 7. O-O d6 8. cxd4 Bb6 9. Nc3 Bg4
In this variation, black does his best to work towards a queenside castle. Attempting to distract white from the normal Qb3 move by pinning the knight.
10. Bb5 Bxf3 11. gxf3
White moves away from the f7 square as this variation does its best to distract white from the f7 square. White also cannot retake the bishop on f3 with the queen as the entire attack is lost after dropping the d4 pawn.
a6 12. Ba4 Ba5 13. Bxc6+

White removes the knight, opening up the queen side.
bxc6 14. Qa4

Black now cannot take the knight without facing Qxc6+, forcing the king to lose castling rights with a rampant queen on the board, and a recapture of the bishop on c3.
Bxc3 15. Qxc6+ Kf8 16. Qxc3

Certainly playable for both sides, but who would you rather be in this situation?
Wrap up of the Evan’s Gambit
It’s impossible to say that the Evan’s Gambit is irrefutable, but hopefully this guide has shown you the advantages you can take over your opponent if they’re not careful.
Ideally it will also show you what not to do when playing against the Evan’s Gambit with black.
Let me know your thoughts and if there are any inaccuracies.
Also, send me your Evan’s Gambit games! I may add them in as variations if they prove something in this article wrong.