Every endgame can boil down to King and pawn endgames if enough pieces are traded.
Therefore it’s essential to understand how to win one when you find yourself in one.
By the end of this article, you’ll be a master at promoting your pawn in this type of king and pawn endgame.
You’ll even master how to draw when you have the long king.
Let’s get started.
Table of Contents>
- Understanding the Square
- How to Promote a Pawn vs a Lone King
- Rook Pawns are Usually Drawn
- How to Draw with a Lone King vs a Pawn and King
- Positions to Test Yourself
Understanding the Square
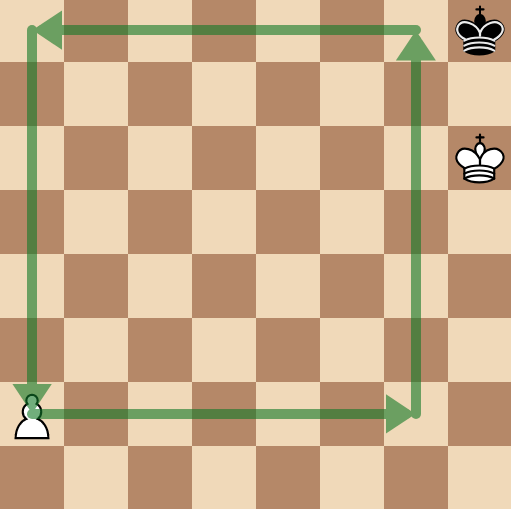
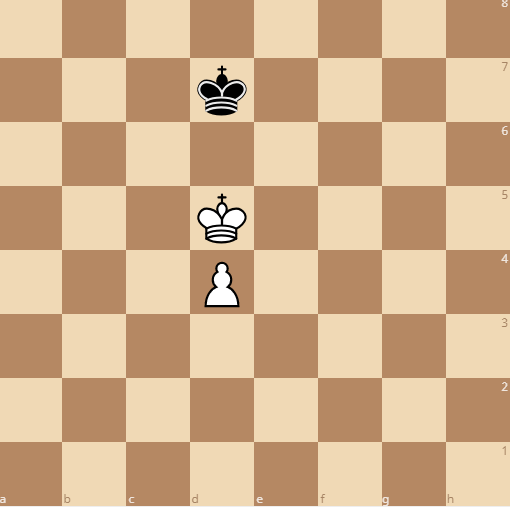
Before thinking about whether or not a pawn can promote with the help of a king, let’s look at a quick rule to always remember. It’s known as the square.

Count the number of squares your pawn is away from the queening square (in this case 4 squares). Then count 4 squares to the right from the queening square, then down 4 squares, then 4 squares back to the pawn itself. You will always be able to make a square with all four sides being the number of squares from the queening square.
If the black king can step into the square before the pawn moves, then the king is in time to stop the pawn from queening.
Let’s see this played out if black can step into the square from this position.
1… Ke7 2. a5 Kd6 3. a6 Kc7 4. a7 Kb7 5. a8=Q+ Kxa8
*Note it doesn’t matter if the king zig zags to the a8 square or goes in a straight line. As long as he is moving towards a8 each move.*
Be careful when counting the square as it can change on the pawn’s first move.
With black to move, it seems that the king can step into the square and stop the pawn from queening. However, the pawn can move 2 squares on its first move, which means the black king is too slow.
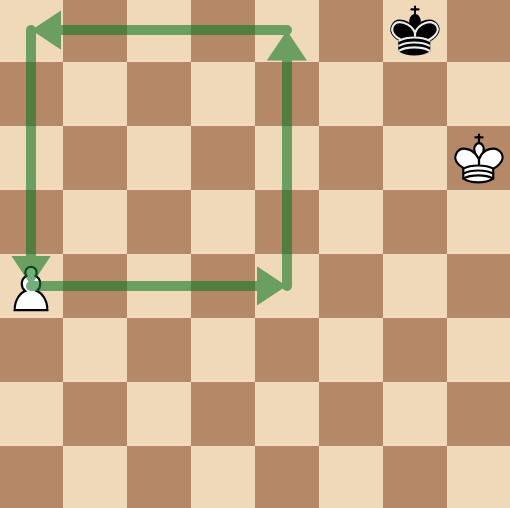
Notice how the square gets smaller, and the black king will only make it to the f file. The square will continue to decrease in size as the pawn moves until it promotes into a queen on a8.
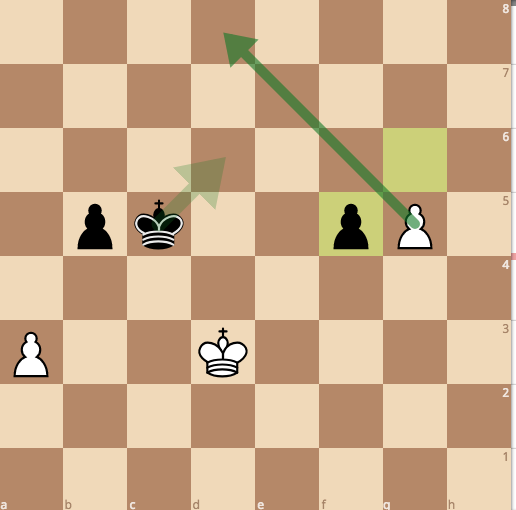
A simpler way to count the square to be able to see if the king can make it in time is to trace a line from the pawn diagonally to another queening square.
The number of moves will be the same distance from the queening square on the same file. This is often quicker and easier in the heat of a game to see if the king is in time.
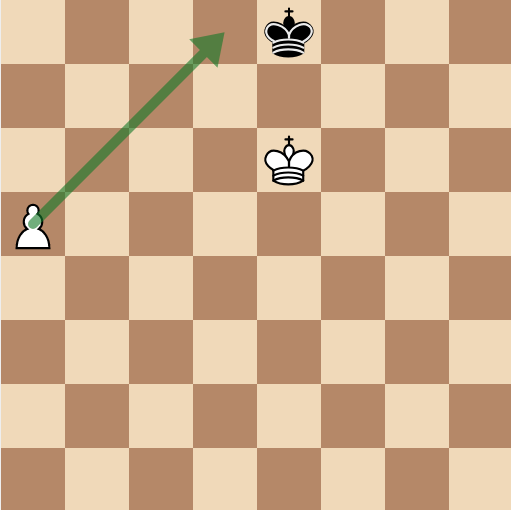
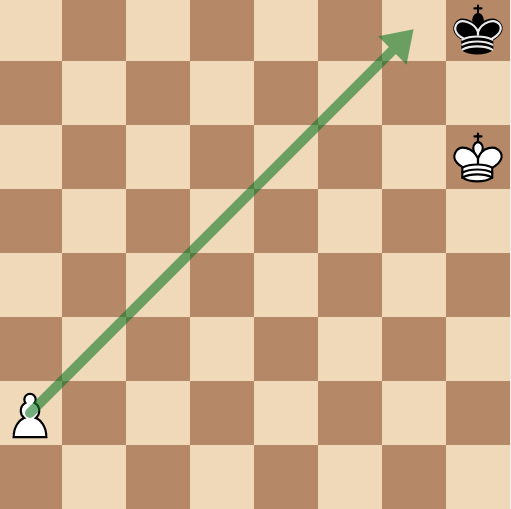
In both examples, the black king is outside the square if it is whites’s move. In the first example black to play means the king is in time, but the second example black to play is not (because the pawn can move 2 squares as we saw previously.
This idea is thematic in many endgames and should always be in the back of your mind. Many times you can create a pawn break if you notice that the king cannot reach the queening square.
Here’s an example from one of my games how this can be a win with more pawns on the board.
1…kc5??
The black king made a mistake and moved away from the pawns on the f and g files. Moving to the c file put the king outside of the square. Perhaps my opponent was thinking there’s no way that pawn can move, but a simple pawn break decides the game quickly.

2. f5!
The idea is that the king is inside the box if the pawn continues moving along the f file, but by attacking the g pawn, the pawn would create a smaller box from the g file.

The pawn must take back and because the king is outside the square, it is not in time to catch the g pawn.
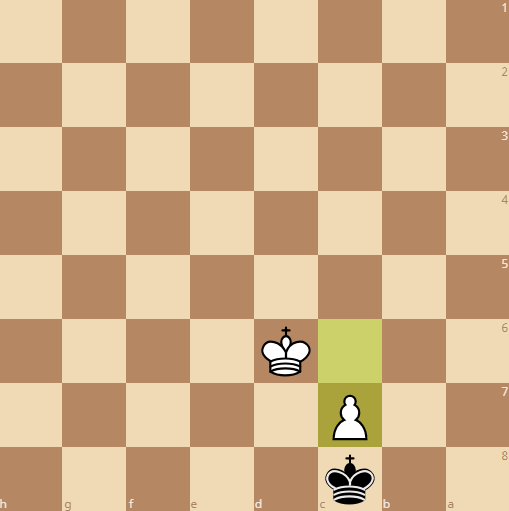
Here’s an example of the square being seen from a rook endgame
My opponent decided to take my passed pawn on b7, not thinking about the square.
Now that my rook can capture his rook, his king must take back with the king, moving the black king outside of my pawn’s square.

After the exchange, my king is in the square of my opponent’s pawn without moving, while black’s king cannot make it into my pawn’s square.
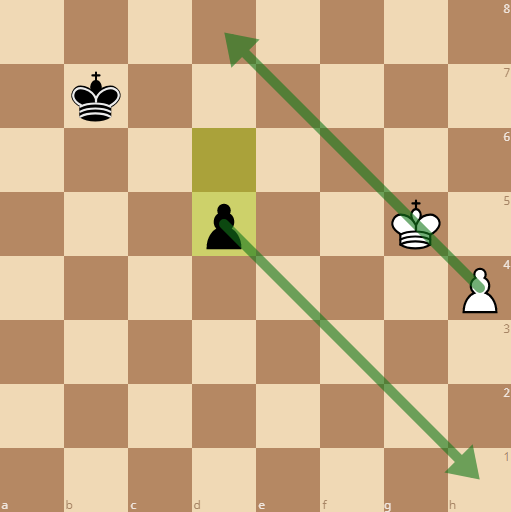
Always keep an eye on potential passed pawns in the endgame with your king. A quick scan to see if your king can reach the square is always important before you make a move.
How to Promote a Pawn vs a Lone King

Now that we understand when a pawn can sprint faster than a king to the finish line, what can white do if the king is within the square?
The position of the kings and the lone pawn makes the difference between a win or a draw. Luckily, white can never lose in this position, but it’s unfortunate when it turns into a draw from a win.
Understanding opposition and king position is extremely important here to win the position.
Let’s start with what the end result should look like to work backwards in how to get here.
It’s helpful to work backwards when playing a king pawn vs king endgame so you can understand what position you are striving for.
This is a very hard thing to do, but I hope these diagrams will help you to understand.
From this position white is winning. Promotion of the pawn into a queen will result in an easy checkmate with a queen.
1. Kc6 Kc8 2. d6 Kd8 3. d7

The key is when you push your pawn, your opponent’s king has to vacate the queening square.
3…Ke7 4. Kc7 Kf6 5. d8=Q+
Or
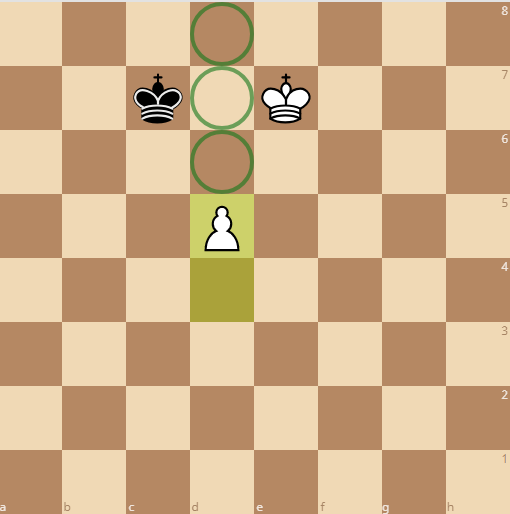
1. Kc6 Ke7 2. Kc7
If the king doesn’t maintain opposition, then you can reach what I call the “dream square” for your king. Now you don’t have to move your king anymore and you can push your pawn safely the rest of the way. All three squares between the kings are protected by the king.
It’s important to note that black has the opposition, but it doesn’t matter because the king is separated from the queening square.

2…Kf7 3. d6 Ke6 4. d7 Ke7 5. d8=Q+
However, it we flip the king and the pawn, it’s a draw.

1. Kc6 Kc8 2. Kd5 Kd7 3. Ke5 Kd8 4. Ke6 Ke8 5. Kd5 Kd7 6. Kc5 Kd8 7. Kc6 Kc8
The kings are just bouncing back and forth with no progress. White is forced to try something else.
8. d7+

8…Kd8 9. Kd6

And the game ends in a stalemate.
What is the difference between how these king and pawn positions started?
The king needs to be in front of the pawn in this type of ending.
If the pawn is pushed too far, then the white pawn cannot queen.
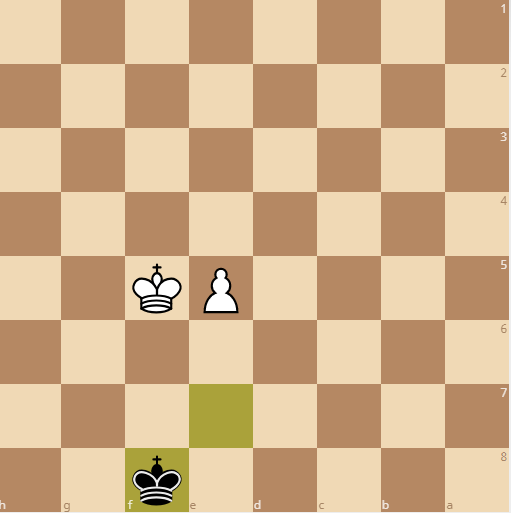
What if the pawn is closer to the edge of the board

While the previous position told us that the white king can move to either side to win, that is not the case when the pawn is closer to the edge.
If white plays Kf6, then black can try to trick white into a draw.
1. Kf6 Kh7 2. Kf7 kh8

And now white cannot play f6 or the position is a stalemate. White can save the position by moving to g6 and playing the correct first move.
1. Kh6 Kh8 2. g6 kg8 3. g7 kf7 4. Kh7 and the pawn queens.
Exception to opposition where the king must move to h6 to win. Kf6 can be a draw after kh7
So if this makes sense to you now, let’s see what happens if the king is in front of the pawn just like we saw, but everything is moved a rank back.

So this should still be a win for white still, right? The answer is: it depends whose move it is.
Right now, if it is white to play, it’s a draw. If it is black to play, white wins.
In every king and pawn endgame, you will want to calculate if you can get to this with your opponent to move.
Let’s play out if white moves.
1. Ke5 Ke7 2. Kd5 Kd7 3. Kc5 Kc7 4. d5
 White can’t make any progress, so the pawn is pushed to try to see if black reacts properly.
4…Kd7 5. d6 Kd8 6. Kc6 Kc8 7. d7+ Kd8 8. Kd6
And we have our same stalemate.
What about if it’s black to play? Why does white win? Because black must give away the opposition.
1… Kc7 2. Ke6 Kc8 3. Ke7 Kc7 4. d5
 White has achieved the “dream square” for the king.
4…Kc8 5. d6 Kb7 6. d7 Kc7 7. d8=Q+
Rook Pawns are Usually Drawn
Rook pawns are always drawn if the King is in front of the pawn.

The reason is that there just isn’t enough space for the defending king to get forced away from the queening square.
Rook pawns are often the exception to winning endgames. You can often draw your opponent despite all of the other rules we’ve seen in this article.
However, the game can also be drawn even if the black king is not in front of the pawn.

Black to move and draw
1…Kf7!
Trapping the white king and not allowing it to escape from the h file without giving away control of the queening square.
2. h6 Kf8 3. Kh8 Kf7 4. Kh7 Kf8

It would be a draw if the kings move back and forth, so the white king tries to leave the h file and promote the pawn.
5. Kg6 Kg8 6. h7+ Kh8 7. Kh6
Now that the black king is in front of the pawn, it’s a draw.

Now Let’s Move all of the Pieces Back One Rank
So again this position depends on who goes first. Let’s move the pawn back a square and see what happens.
In this position, it doesn’t matter whose move it is. White will win. The key here is the square between the white king and its pawn.

1. d4
Now white maintains the opposition and black must give way. Then the queening pattern is the same as we’ve already seen.
1…Ke7 2. Kc6 Kd8 3. Kd6 Kc8 4. d5 Kd8 5. Kc6 Kc8 6. d6 Kd8 7. d7 Ke7 8. Kc7 Ke6 9. d8=Q
Let’s try to get to this position now from further out.
Now that we understand the main ideas, let’s make a queen for white. It’s important to understand everything we’ve learned so far. First let’s get to the space between the king and pawn position we just saw.

White to play and win. What is the main idea?
1. Kd2 Kd7 2. Kd3 Ke6 3. Ke4

Great! Now black must give away the opposition and the rest is easy.
3…Kd6 4. Kf5 Ke7 5. e3 Kd6 6. e4 Ke7 7. Ke5

White grabs the opposition and black must move again.
Kd7 8. Kf6 Ke8 9. Ke6 Kf8 10. e5 Ke8

And even though white must give away the opposition, it’s a win because the pawn is on the 5th rank and the king is on the 6th.
11. Kd6 Kd8 12. e6 Ke8 13. e7 Kf7 14. Kd7 Kf6 15. e8=Q
To recap:

This is a draw if it is white’s move and an important point to avoid for white and attain for black to save the game.

This however is a win for white no matter who’s move it is
Once you get the pawn to the 5th and the king to the 6th, it’s a win no matter who has the move

How to Draw with a Lone King vs a Pawn and King
All of this assumes black played the right way. Now that we see how to win with white, let’s learn how to defend with black.
If you remember nothing else, remember this: Always keep the king in front of the pawn when you can.
White can play tricky, and out of order from what we’ve seen in this article. The key is to always understand where to move your king.
Black can accidentally make a loss from a draw, so watch out for tricks! Let’s flip the board and see.

Black only has 3 legal moves: d8, c7, and b8. Two lose and one draws.
If we follow our one rule, this is easy to see.

c7 is the only move. The others lose.
1…Kd8 2. Kd6 Kc8 3. c7
And now black must give away the queening square and white can reach the “dream square” and queen.
Let’s see if white tries to confuse black before pushing the pawn too far in a drawn position.

Black to play. Where should the king move?
1… Ke7 2. Kd5 Kd7 3. Kd4

Now the black king must make a decision since white moved backwards. The best answer is always in front of the pawn
3…Ke7 4. Kd5 Kd7 5. Kd4 Ke6 6. Ke4 Kf7 7. Kf4 Ke7 8. Kf5

White is being stubborn and trying the other side of the board. Where must black go? Opposition!
If black moves too quick and doesn’t take opposition, then it’s disastrous.
White jumps into the winning square on e3, as we saw earlier. The pawn on the 5th and the king on the 6th always wins for white.
Even if white tries to confuse you by moving differently than expected, as long as the pawn is ahead of the king and black can maintain opposition or get in front of the pawn, then it should be a draw with the best moves.
Practice positions to understand when it’s a draw and when it’s a win
Take a look at these example positions and try to determine if they are a win or a draw right away. (Hover over them for the answeR)
Assume it is white to play in all of them. (as a bonus, try to think of what happens if it’s black to play).

Win

win

draw

draw

draw

draw

win
You can never lose a a king and pawn vs king ending if you have the pawn, but it sucks when you draw after you had a win.
I hope you remember these scenarios in your games. You may be surprised how often they come up in your games.
If you learned something new, post it in the comments!